Custom Fly Fishing Rods by Chris Lantzy, Custom Rod Maker
  • Home
  • Split-Bamboo Fly Rods
    • Prudential Series
    • Classical Series
    • Custom Series
    • Mortised Fly Rods
    • Rod Tapers
  • Graphite & Fiberglass Fly Rods
    • Fiberglass Fly Rods
    • Classical & Custom Series Graphite
  • Available Rods
    • Available Reels, Accessories, etc.
  • Leather Accessories
  • Designing Your Custom Fly Rod
    • Frequently Asked Questions
    • Overveiw of Making A Split-Bamboo Rod
    • Tackle Tips
  • About
    • Rod Making Philosophy
  • Links
  • Contact
  • The Pliant Rod (Blog & News)
    • Beyond The Rod Shop
Custom Fly Fishing Rods by Chris Lantzy, Custom Rod Maker

the pliant rod:

blog & news

Some Thoughts On Switch Rods

11/29/2012

 
More & more often folks have been asking me about switch rods: do I make them & do I have any thoughts or suggestions about them. Switch rods seem to be growing in popularity in the last few years, so I figured I'd share some thoughts I have about them.

First off, switch rods are essentially fly rods that have a front & rear grip that allows the rod to be cast like a spey rod (with two hands) or with one hand, like a traditional fly rod. Switch rods are smaller than spey rods, usually being 10 to 12 feet long & ranging in line weights of 4 to about 8 weight. There's a whole bunch of different ways to cast a switch rod & learning to use them is half the fun. They're also very good at swinging a wet fly (like a spey rod), but they can also be used to dead drift nymphs, streamers, etc. Because they're longer rods, the angler (once you get onto it) has more line control. This means that switch rods can be used in smaller water & places where you'd never consider using a spey rod. Because these rods are so versatile they can be used to fish for many different species of fish from large trout to salmon to bass & even for bone fish in salt water.

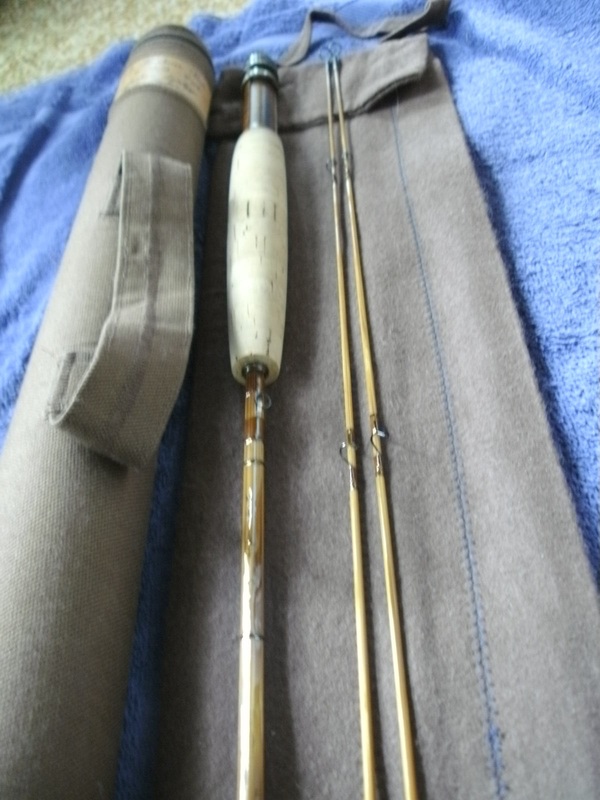
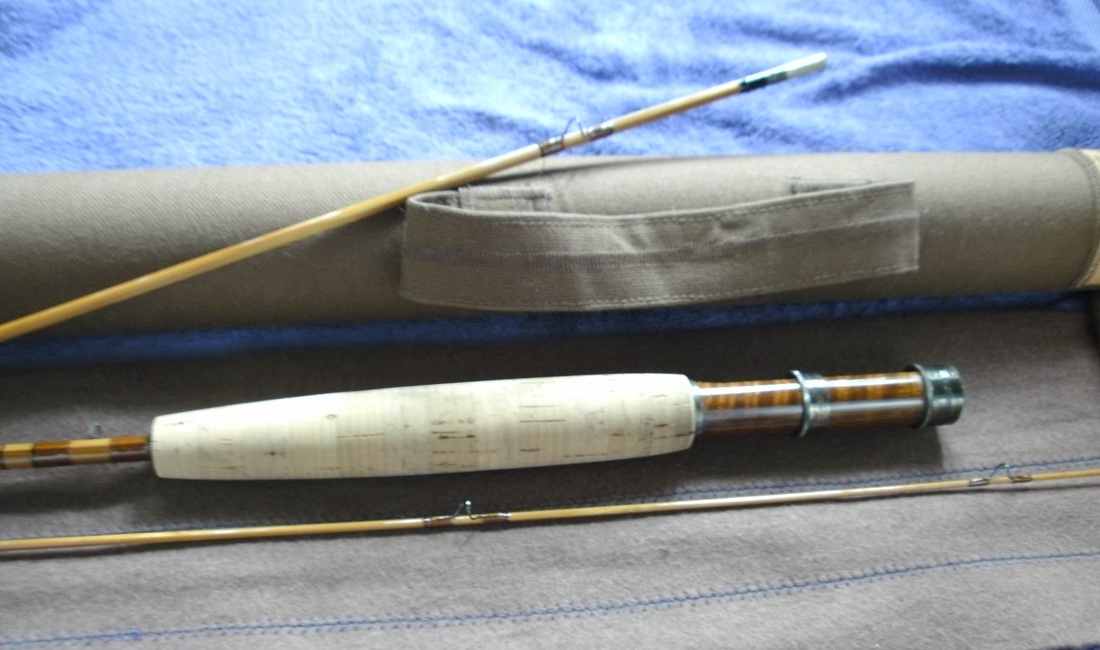
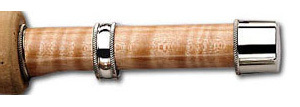
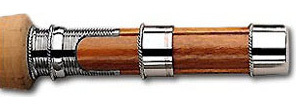
One suggestion that I do make to clients interested in switch rods concerns the rod's front grip. While the fore grip on these rods is, & should be, longer than "normal" fly rods, I feel most anglers would be happier with a standard shape to the the front grip. Many commercially made switch rods are offered with odd shaped fore grips that are, in my opinion, too long. The majority of anglers (especially those who are buying their first switch rod) seem to be happier with either a reverse-welles shaped grip or a straight grip that has a slight forward taper towards the rod tip. In that way you get the best of both worlds: the rod feels like a one handed rod when casting with one hand, & yet still feels like a two handed rod when fishing it that way. Having a familiar shaped front grip helps make these rods more comfortable & versatile, thus helping you get the most enjoyment out of fishing with it.

I have & do make custom switch rods for clients who request them. I make them only in graphite. This is because of both the harsher environs that switch rods tend to be used in & because there are some excellent graphite rod blanks out there designed specifically for switch rod use. I don't list them in my catalog yet, & I don't have a standard rod blank that I use for switch rods. Instead, I make switch rods on the specific blanks, from the specific manufacturers, that my clients request.

In the future (hopefully by early next year) I hope to have a standard blank on which I'll make these rods. In fact, I'll probably list them as their own category of rods in my catalog. Of course I'll still continue to make a rod on any specific manufacturer's rod blank model that you request as well.

Switch rods are growing in popularity among many fly anglers. If you fish with one in the proper setting & way it's easy to see why. If you have any thoughts or ideas about switch rods I'd enjoy hearing from you. Please contact me to discuss your custom switch rod.

Pennsylvania To Offer Multi-Year Fishing Licenses 

11/28/2012

 
Starting on December 1, 2012 the PA Fish & Boat Commission will make available for the first time multi-year fishing licenses. This means that you can now buy a license that is good for 3 years or 5 years - in addition to the single year licenses that they always have sold. You can also get Lake Erie stamps, trout stamps, & combo Erie/trout stamps that are also good for 3 & 5 years, too.


Basically, this allows you to save some money when buying your fishing license. That's because every time you buy a fishing license in PA, you pay an electronic processing fee & an issuing agent fee. While these fees aren't much, the do add up over the years. Buying a license that's good for a few years will mean that you won't have to pay the extra fees for the extra years the license is good for. Plus, you won't have to worry about getting a new license every year. This is especially helpful for the folks who fish every year in PA, but live out of state. Normally, your first stop when taking a trip in PA would be to an issuing agent to buy a license every year. 


Do check the new prices for these multi-year licenses. If your an angler who doesn't fish in PA very often, then it's probably not worth the extra money. However, for those of us who fish a lot in the Keystone state, then it could be really convenient. You can see the prices for these new multi-year licenses HERE. If you have any questions about fishing licenses in general, the Fish & Boat Commission have a webpage of answers to all your questions HERE. 


Also on December 1st, the Commission will be raffling off different fishing trips to various locations. It sounds like a good opportunity to win a nice fishing trip to one of PA's more famous fishing locations. You can learn more about these trips HERE. 

Happy Thanksgiving Everyone!!!

11/21/2012

 
Picture

Custom Series Rods: An Example

11/21/2012

 
Custom Series rods - like all other rods I make - can be made to order for your specific requests in both function & appearance. Here is one example of a Custom Series rod I recently completed for a good friend & client. Working with them to create the right rod taper & specific aesthetic features, we were able to make a truly unique rod that looked great while meeting the needs of their particular fishing situation.

This rod is a 6'-4" 2 piece/2 tip, made for a 4 weight line. The taper for this rod is unique, as I worked & calculated it to give them the rod action they wanted. This rod featured:

-Darker, richly flamed bamboo (slightly darker than my standard rods)

-Titanium line guides & tip tops

-Blued, or darkened, ferrules, winding check, & reel seat metal. The bluing was done in my shop to get the proper color to match the titanium guides

-Custom engraving on the reel seat end cap & slide band

-The stone in the agate stripping guide was chosen to match the color of the brown silk wraps

-A custom square rod case with personalized inscriptions

This rod is just one example of the possibilities you & I can come up with when we work together to make your custom fly rod. Please contact me to discuss what you want your fly rod to be.

A Reminder To Clean Your Fly Rod, Again...

11/17/2012

 
So I've posted this article before, & it also appears on the "Tackle Tips" page of this website, but I feel it bears repeating. This is especially important at this time of year when many anglers are storing away their equipment for another winter. It's very important to make sure that your fly rod is clean when you store it away for a long time. Rods stored in bad condition can mildew & that will break down the varnish on a bamboo rod, the coating on graphite or fiberglass, eat away at the cork grip, bung up screw-locking reel seats, etc. Before you get the rifle or shotgun out for hunting season & put the fly rod in the back of the closet, make sure that the rod is clean - please. Without further ado, here is how to clean your fly rod: 

How To Clean Your Fly Rod:

No matter if you have a graphite, fiberglass, or a bamboo fly rod after use they get dirty. Along with the dirt & grime that rods acquire from use, they sometimes get watermarks on the shaft from being in contact with a wet fly line. For these problems that arise from normal use (we're not talking about damage here), it's a good idea to gently clean the shafts of the rod with some liquid window cleaner (like windex, etc) & a soft, clean towel. Spray the window cleaner onto the towel & wipe down the rod shafts gently. Then follow that by wiping the shafts dry with another soft, clean, & dry towel. Make sure to get the area beneath the line guides & the guides themselves.

Next, if you have a bamboo rod with varnish, or a fiberglass or graphite rod with a gloss, shiny finish, go over the rod with a good furniture polish - the same kind you use around the house (Old English, Pledge, etc). Again, spray the wax on a clean, soft towel, & wipe off the wax with another dry towel. Make sure that you get the line guides as well but make sure you get all the excess wax off the line guides. If you don't, it will build up on the guides & slow your fly line down. 

DO NOT WAX THE FERRULES!!! This is especially true for the metal ferrules of a bamboo rod. Never ever wax the ferrules. If you need to clean the metal ferrules of a bamboo or older fiberglass rod, put some rubbing alcohol onto a clean, soft towel & wipe the ferrules with the alcohol. Then wipe them again with a clean, dry towel. Make sure the towels are clean & do not have anything on them that will scratch the ferrules. To clean the inside of a metal female ferrule, dip a cotton swab into some rubbing alcohol & swirl it around inside the ferrule. Keep doing this with a fresh cotton swab each time until they no longer have dirt on them. Then dry the inside of the female ferrule with a dry cotton swab before assembling the rod.

If you have a rod with a matte finish, just clean the rod with the liquid glass cleaner, or warm water only. Don't wax the shafts of the rod, but you can wax the line guides & the guide wraps if you wish.

Finally, after you've cleaned & polished the rod, I like to go over it one more time with a "dry sweeping cloth" (like "swifter") that are available at most retail stores. This really polishes the rod up & gives it a nice appearance. It also removes fingerprints & other smudges.

Regular cleaning helps to protect the finish of the rod & to protect the guide wraps & labels or inscriptions on the rod shafts. If you take the time to clean your fly rod & keep it looking good, you'll be going a long way to getting more years of use from it.

Just For Laughs....

11/12/2012

 
A friend sent me this picture the other day. It made me chuckle, so I thought I'd share it with you.
Picture

Cap & Ring Reel Seats

11/9/2012

 
Lately more than one person has expressed to me a concern that reel seats with a slide band, or the cap & ring style reel seat, might come loose while fishing & cause the reel to fall off the rod. This is an age old myth, perhaps propagated by either poorly designed reel seats or by large tackle manufacturers who only want to offer one style of reel seat in order to streamline production & lower costs. The truth is that a well designed & made cap & ring reel seat will hold any reel to any rod without coming loose.

Picture
If you look at old, antique rods made before the 20th century - before the screw-locking reel seat was invented - rods all used slide bands to hold the reel. You can even see old behemoth salmon rods with only two narrow rings to hold the reel's feet. There was nothing wrong with these. They worked just fine, even with large fish in rough conditions.

What really matters is how well a reel seat is designed & made. A proper slide band is designed with a slight bevel on the inside so as to hold the reel on with a friction fit. Keep in mind - that it's also a friction fit in the ferrules holding the rod sections together!! So, there's no need to shy away from using a good cap & ring reel seat for any fly rod.

What should really dictate your decision when choosing a style of reel seat is what you like. After Wes Jordon invented the screw-locking seat, many anglers took to it because they felt it gave them added security. So many rods - especially larger ones- were made with those types of seats that it became common to see them on many rods. Today, tradition & style usually dictate that larger, heavier rods get a screw-locking reel seat while shorter, lighter rods have a cap & ring style. 


Picture
Either way, the choice is yours & you aren't a weirdo or crazy for asking for a cap & ring seat on a larger rod. Style & traditions aside - this is your fly rod & you can have anything you want on your rod. These days you have more choices than ever as both styles of reel seats come in a wide variety of looks. 
Picture

Election Day (With A Fishing Story)

11/5/2012

 
Tomorrow my fellow Americans & I will choose a President for the next four years. It's seems like this election cycle has been going on forever & that most of us are exhausted with political ads, news reports, & politcal polls. If you're a student of history, you know that elections weren't always like this. 


Anyway, lately when I've been thinking of the Presidential election, I'm reminded of President Grover Cleveland. He was an avid angler & wrote often in The Saturday Evening Post about his fishing adventures. Many other past presidents were fly anglers, but perhaps none of them loved the sport more than President Cleveland. He was a colorful man & many who knew him passed on anecdotes & stories about him. Of course, I find the fishing stories to be my favorites. One of my favorites was published in The Saturday Evening Post on November 29, 1902:


"Along the upper Potomac, between Great Falls & Harper's Ferry, Grover Cleveland, when he was president, found great delight in fishing. Among the canal men & fishermen of the vicinity many interesting incidents of the eminent visitor's outings are repeated.


At the place on the Potomac known as Point of Rocks the president was fishing one day & with democratic simplicity chatting with some boatmen. One of the latter remarked that people in that vicinity were very glad to see the President enjoying himself.


"Yes," said the President, "there are two ideal states of happiness in the world, & one of them is to fish & catch something," & he pointed to his string of bass.


"What's the other happy state?" ventured one of his auditors.


"The other great felicity," replied the President, pointing to one of the members of his party, who had been casting his line diligently & with great enjoyment but without other visible results, "is to fish & not catch anything."


Obviously, President Cleveland was a real wise-acre. 


Tomorrow's election is an important one, so no matter which way you lean politically, be sure to get out there & vote. So many have given so much so that we can have the right to vote. Please don't take it for granted. Take part in our great democracy. As they say in Chicago, vote early & often!!!

Repairing Loose Fitting Ferrules on Graphite and Fiberglass Fly Rods

11/3/2012

 
(This is for modern synthetic rods only. The process to repair metal ferrules is completely different. Do not attempt any of this on metal ferrules)

The ferrules on a rod will sometimes become loose fitting with age & use. This can be a fairly normal condition on an older rod that’s been used a lot – especially if a rod has seen many years on the water. When the ferrules get to the point that the tip section of the rod wants to fly off of the butt section when casting, something has to be done. If you’ve been using the rod for years then I doubt you’ll want to retire the rod. The only satisfactory thing to do is to fix the ferrules.

There are two types of ferrules seen on modern synthetic fly rods: the tip-over-butt design, & the spigot ferrule. No matter which ferrule your rod has, they function in the same way in that they hold the rod together by a friction fit. In other words, a male section (most likely tapered to some degree) slides into a female section (also most likely tapered) until the friction between the two holds the two rod sections together. Anyone who’s ever put a rod together knows this. But when the fit between the male & female ferrules loosen with age & use this friction fit will no longer work. Consider how many times a rod gets put together & taken apart, add in stresses put on the ferrules while casting & fighting fish, & it’s no sin for a rod that’s seen a lot of action to have loose ferrules.

A small piece of advice before we start: know thyself. If you are not at all “handy” or you have no experience repairing the material things in your life do not attempt to fix your rod’s ferrules. Leave it to a competent rod maker. However, if you’re the do-it-yourself type & enjoy tinkering with things, then don’t shy away from doing this yourself. It’s not that difficult of a job & with careful patience you will be successful.

If the ferrules have worn to the point that they no longer hold the rod together there can only be one reason: wear. Either the female or the male ferrule has worn away causing the slippage. So, which part should you repair, male or female? I highly recommend working on the male section, even if it’s the female section that’s worn. That’s because it’s very difficult to do any accurate work inside the female section. The male is out in the open where you can get at it & work evenly all the way around it. So here we will focus on the male ferrule section.

The trick is to build up the male section with new material until it fits snuggly into the female section again, like it did when it was new. Here’s the supplies you’ll need:

-2 part epoxy glue. The longer the set-up time, & stronger bond strength, the better.

-1 cheap, small hobby paint brush (the ones modelers use)

-500 & 1,000 grit sandpaper cut into several small pieces about 2” long by ¾” wide

-0000 steel wool

-Isopropyl (rubbing) alcohol – or whatever agent is recommended to clean up the glue (check the instructions on the glue)

-Plenty of patience & time – especially the first time you attempt this job

Here are the steps to take:

1.)    Mix the epoxy according to the directions. Mix only a small amount, you don’t need a lot.

2.)    If you repairing a rod with the tip-over-butt style ferrule, mark the butt section with a felt tip pen where the female (tip) ferrule ends on the butt section. Do not work below this point.

3.)    With the small hobby paint brush, coat the male ferrule section with the epoxy as evenly as possible. Do NOT put a lot on. The lightest coat that you can evenly spread on will do.

4.)    Let the rod set overnight. Place it in such a way that the epoxy won’t run down onto the rod where you don’t want it. Place the rod horizontally & turn the rod often to keep the epoxy from building up on one side of the ferrule.

5.)    The next day, after the epoxy is completely set, check the ferrule fit. If they are still loose, then repeat the previous steps. If the rod sections will not go together (the male is now too big to fit), you’re ready to proceed re-fitting the ferrules.

6.)    Starting with 500 grit sandpaper lay the rod’s butt section (or the sect w/ the male ferrule) across your lap. With your hand flat on the rod, roll it back & forth across your thigh while holding the sandpaper on the male section with your other hand. Hold, or pinch, the sandpaper around the male section as you roll the rod back & forth across your lap. Hold the sandpaper with just enough pressure to allow the rod to roll. This is sometimes referred to as a “lap lathe”. Here you don’t move the sandpaper, you move the rod.

7.)    Start at the far end of the male & work your way down towards the grip end, checking & re-checking the fit between the sections quite often. As you begin to get more & more of the male section to fit properly, mark it with a pencil at the point where it stops inside the female. Now continue working down from that point.

8.)    Continue turning the rod & sanding away the epoxy until the ferrules fit completely as they should. This will take some time, so be patient. You will eventually get there.

9.)    Finish the job by lightly polishing the male ferrule section with 1,000 grit sandpaper followed by 0000 steel wool.

Notes:

-I use epoxy because it’s strong, hard, & waterproof. Just make sure you use it sparingly. The more of it you coat on the ferrule, the more sanding you will have to do.

-It’s not uncommon for a ferrule to be worn on only one side (typically towards the guides). As you roll the rod while sanding, you’re actually re-centering the ferrule’s fit. Be sure to roll the rod evenly. As you progress with the sanding you may find that you end up with epoxy on only one side of the male, or only in certain places. Don’t be shocked if you end up sanding away almost all the epoxy you put on. That’s okay. Sometimes it’s only one small section that was worn causing the ferrules to become loose. The epoxy will fill in all the low & uneven spots on the male section.

-Let the fit between the sections be your guide. For rods with spigot ferrules, if there was a small gap between the sections when the rod was new, try to keep that gap when doing this job.  

-It’s very important to polish the male section (1,000 grit & 0000 steel wool). Any rough spots of epoxy left may catch on the female section & be torn off, thereby undoing everything you just did. Run your fingertips along the male section when you’re done working. It should feel even & smooth.

-If you go too far, sand off too much epoxy, & the ferrules become loose again don’t panic-It’s not the end of the world. You’ll just have to start over. Just be sure not to sand away so much that you remove any of the original ferrule material. Even then you can still fix it, you’re just making more work for yourself.

-Lawn cast the rod before you take it fishing. Really put it through its paces to make sure the two rod sections will hold together. Better to find out there’s still a problem on the lawn then the moment you’ve hooked into a nice fish.

While all this may sound complicated, it’s actually a very simple job to do. With some time & patience you’ll have that old favorite rod of yours back to catching fish again. Now go dig that rod out from the back of the closet & get to work. Both of you still have a lot of fish to catch.
 

New Fly Rod; Which Fly Line To Use?

11/2/2012

 
A question I get asked frequently when someone orders a rod from is: "what type of fly line do you recommend"? That, in my opinion, is a really good question.

What I usually tell folks depends on their past experiences. For example, if you're familiar with many different types of fly lines from different manufacturers, than choose a fly line that you feel will best enable the rod to do what you want it to do (i.e. dry fly fishing, bass fishing, etc). 


However, if you're not up on all the latest fly lines, like most of us, than I always recommend that you use the same make of fly line you've been using on your  other rods - in the appropriate weight for the new rod, of course. That way you'll be able to really compare your new rod to your other ones & have a good idea of how your rod will perform. If you've always been a fan of, say, Scientific Anglers for example, than use their fly line on your new rod - to get started at least. Later on you can start to experiment with different types of fly lines.


More than one of my bamboo & fiberglass clients have used the Cortland "Sylk" fly line - a synthetic line made to mimic the old silk lines, but without all the care & maintenance required. My past experiences find nothing wrong with these lines & I think they perform very well, but then again many lines will perform well.


Finally, if you're not very sure about which fly line to put on any rod, I suggest you take your fly rod with you on a visit to a local fly shop with a good reputation - one that you trust. The folks at almost any decent fly shop will gladly take the time to walk you through all the different types of lines you could use, allow you to compare them (even cast them), & offer you expert advice to help you decide. You can almost never go wrong at a small, local, independent fly shop.

    The Pliant Rod

    News from the shop of Chris Lantzy, Custom Rod Maker along with industry news, profiles of interesting characters, reviews, history, & whatever else strikes our fancy. Your comments & feedback are welcome. Please email me your thoughts.


     leather accessories

    Cases, bags, wallets, & other fine leather angling accessories.
    Picture

    instagram

    See more photos from the rod shop & stream sides!
    Picture

    SEE MORE ROD PHOTOS!!!

    Please visit my Flickr pages to see even more rod photos including those available for sale, different rod features, & more. I'll be continuing to add photos there, so check it often. 

    Watch Some Videos!!

    Take a look into the rod shop & see some rods in living color motion pictures!! Check out my youtube videos. 
    Picture

    Categories

    All
    Angling Art
    Angling Art
    Angling Profiles
    Books & Videos Etc
    Books & Videos Etc
    Books & Videos Etc
    Books & Videos Etc
    Favorite Flies
    Fly Fishing
    Fly Fishing
    General Angling News
    General Angling News
    Industry News
    Industry News
    Shop News
    Shop News
    Tackle Tips
    Tackle Tips
    Vintage Tackle
    Vintage Tackle

    Archives

    January 2021
    December 2020
    November 2020
    October 2020
    September 2020
    August 2020
    July 2020
    June 2020
    May 2020
    April 2020
    March 2020
    February 2020
    January 2020
    December 2019
    November 2019
    October 2019
    September 2019
    August 2019
    July 2019
    June 2019
    May 2019
    April 2019
    March 2019
    February 2019
    January 2019
    December 2018
    November 2018
    October 2018
    September 2018
    August 2018
    July 2018
    June 2018
    May 2018
    April 2018
    March 2018
    February 2018
    January 2018
    December 2017
    November 2017
    October 2017
    September 2017
    August 2017
    July 2017
    June 2017
    May 2017
    April 2017
    March 2017
    February 2017
    January 2017
    December 2016
    November 2016
    October 2016
    September 2016
    August 2016
    July 2016
    June 2016
    May 2016
    April 2016
    March 2016
    February 2016
    January 2016
    December 2015
    November 2015
    October 2015
    September 2015
    August 2015
    July 2015
    June 2015
    May 2015
    April 2015
    March 2015
    February 2015
    January 2015
    December 2014
    November 2014
    October 2014
    September 2014
    August 2014
    July 2014
    June 2014
    May 2014
    April 2014
    March 2014
    February 2014
    January 2014
    December 2013
    November 2013
    October 2013
    September 2013
    August 2013
    July 2013
    June 2013
    May 2013
    April 2013
    March 2013
    February 2013
    January 2013
    December 2012
    November 2012
    October 2012
    September 2012
    August 2012
    July 2012
    June 2012
    May 2012
    April 2012
    March 2012
    February 2012
    January 2012
    December 2011
    November 2011
    October 2011
    September 2011
    August 2011
    July 2011
    June 2011
    May 2011
    April 2011
    March 2011
    February 2011
    January 2011

    RSS Feed

Powered by Create your own unique website with customizable templates.