Custom Fly Fishing Rods by Chris Lantzy, Custom Rod Maker
  • Home
  • Split-Bamboo Fly Rods
    • Custom Series
    • Classical Series
    • Prudential Series
    • Mortised Fly Rods
    • Rod Tapers
  • Graphite & Fiberglass Fly Rods
    • Fiberglass Fly Rods
    • Classical & Custom Series Graphite
  • Available Rods
    • Available Reels, Accessories, etc.
  • Leather Accessories
  • Designing Your Custom Fly Rod
    • Frequently Asked Questions
    • Overveiw of Making A Split-Bamboo Rod
    • Tackle Tips
  • About
    • Rod Making Philosophy
  • Links
  • Contact
  • The Pliant Rod (Blog & News)
    • Beyond The Rod Shop
Custom Fly Fishing Rods by Chris Lantzy, Custom Rod Maker

the pliant rod:

blog & news

Fishing In A Sinkhole 

8/31/2015

 
We can't all live on the banks of the Spring Creek, or withing walking distance of the Yellowstone River. Most of us have to make due with what we've got. I've always said that anglers are always looking, always thinking of new spots where they can fish. Well, this just proves my point.....

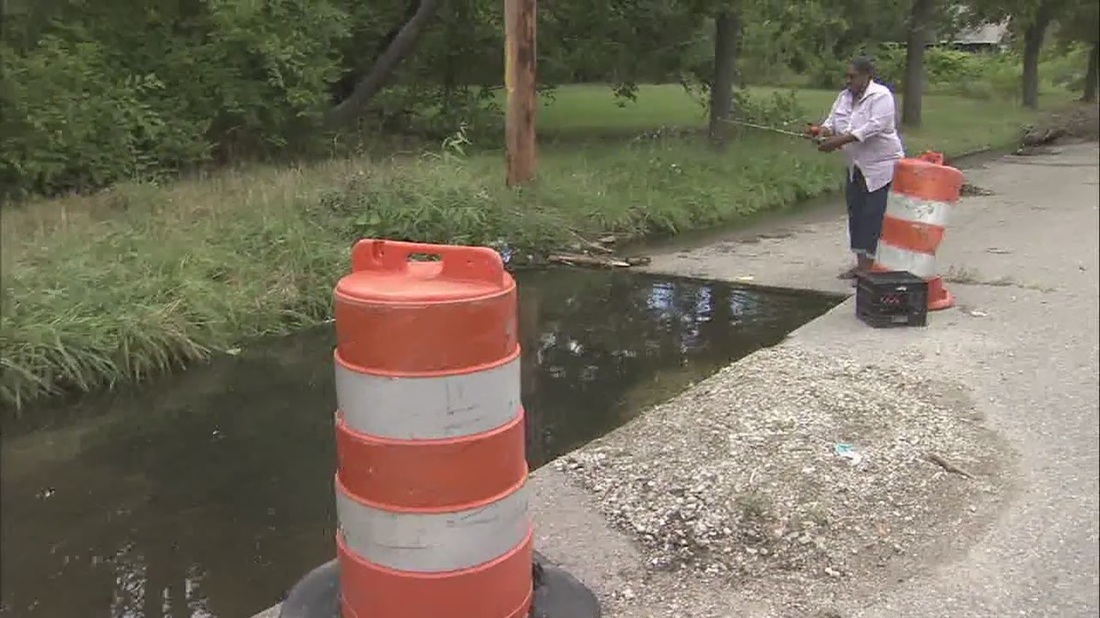
It made news the other day when it became known that residents in one Detroit neighborhood had taken to fishing in a large sinkhole in one of their streets. You see, years ago a local gas company had been working on the lines there & they never filled in the hole they made. They just left it open. Residents complained, but evidently nobody who could do anything about it would listen. 

Eventually, as any open hole in the ground might do, the whole filled up with water. So someone went out & stocked the hole with carp, bluegill, & gold fish - all good fish for sinkhole fishing. Residents began to fish the sinkhole & it has become a popular neighborhood attraction & pastime.  
Picture
I say good for those folks!! Why not? Now you don't have to drive anywhere to go fishing - just walk down the street & get some fishing in!!

You can watch a local television news story about this "hot spot" here: 

Tying The Adams Dry Fly

8/24/2015

 
The Adams is probably the most popular dry fly for trout ever made. There's good reason for that: it will catch fish anywhere in the world where there are trout feeding on the surface. 

Now, the original Adams fly design was different than the one we've all come to know as the classic today (another post later on the original Adams fly in the near future), but it has gone through many alterations over the decades. In fact, there are many different versions of the Adams in books & for sale these days. Go ahead & try them all, but for me, you really can't beat the original.

As there are many different ways to tie an Adams, it helps to know the basic way to tie one up before you go about trying to alter the pattern. The videos below is a really good demonstration of how to tie the traditional Adams dry fly. Plus, it's got some really good, practical tips that show you some really good ideas on how to tie it better & with more ease.

Anytime of year, & on any trout stream where the trout are either feeding on top or you want to search with a dry fly, it's hard to beat an Adams. Tying one of them on is never a bad decision. 

Here, then, is a really good video on how to tie the Adams:

Young Fly Caster Makes History

8/19/2015

 
Fly casting well is a hard skill to learn. It takes a lot of practice. Most of us struggle with it at times, even after years of fly fishing & we can all improve our casting abilities. Then there are those few in the world who are truly the best at it - they have a gift for it.


Enter 11 year old Maxine McCormick. Recently at the U.S. National Casting Championships in Long Beach, California she finished fourth in fly casting accuracy, made the All-America Team, & broke the all time highest women's score ever! She also broke seven records in the junior categories, too. Folks, she did all this & she's only 11 years old!!!


My friend James, who is a member of the Golden Gate Casting Club & has been watching Maxine develop as a rod caster, told me about her a while ago. I think he's absolutely right in that she shows a bright future in this sport.


You can read an article about her recent accomplishments HERE.


Remember her name, as I'm sure we'll be hearing about her again. No doubt the sport is in good hands with young people like her. Way to go Maxine!!!

Nymphs: The Weighting Is The Hardest Part - Part II

8/18/2015

 
I was reading a chapter in an instructional fly fishing book the other day that said when fishing with nymphs you always want your fly on the bottom; that if it gets hung up rocks now & then you know you're fishing your nymph correctly. The author then went on to say that if you don't get your nymph fly on the bottom, you're not fishing it correctly. In other words, he felt that you should never float a nymph.


To that I say pfui! Poppycock!! True, many times when nymph fishing you do want your fly on the bottom, but there are times when you want it off the bottom, too. The trick with nymphs - or any sub-surface fly - is to get it to the level where the trout are feeding. 


In part I of this article we discussed adding weight to your nymph patterns with wire, right on the hook underneath the fur & feathers of the pattern. That is a very effective way to get your nymphs lower in the water, but there are other ways to add weight & get more control over just how deep in the water column your fly will be drifting. It takes some thought & experience to get it right.


For those of you who have ever watched various mayfly nymphs or caddis larva move across a stream bottom, you've probably noticed that they don't always crawl. Most of the time, especially if there's any kind of water current, they tend to bounce their way down stream. They move along the bottom for a little bit & then are picked up by the current (some actually undulate or swim), lifted a few inches or so, & then drift back down to the bottom. This repeats over & over as they work their way down stream. Often trout will take them on this bounce when they're off the bottom. It's easy pickings for the trout.


You want your fly to imitate that movement of the natural. One good way to do that is to add weight to your leader. I like to use round split-shot in size BB, but there are other types of on-leader types of weights. Use whatever type you like. 


You want to add  enough so that it pulls your leader, or tippet, down to the bottom. You then adjust how far up from the fly to put the weight(s). You see your nymph, being lighter than the weight on your leader will float above the weight that is on the stream bed. The water current pulls the fly down stream, which also drags the weight along, too. As they both move down stream your nymph begins to sink towards the bottom & then move back up again as your weight starts to settle back down on the bottom. All this over & over again as your nymph undulates, rises & falls, as it drifts down stream.


***The farther you put your weight from your fly, the higher it will "bounce" off the bottom. You need to know how far off the bottom the trout are taking the naturals so you can get your fly at that same level. Likewise, the closer you put the weight to your fly, the closer it will drift to the bottom. Keep experimenting with the weight closer or farther from your fly on the leader until you start picking up fish.


Many nymphs continue this up & down motion on their way to the surface to hatch. They keep going higher & higher as they continue to rise & dip. They are slowly working their way to the surface to hatch. Again, experiment with how deep you fish your flies. You might be surprised to be taking trout on nymphs just below the surface in the minutes before a hatch begins.


My entire point here is that you should always try fishing your nymphs at different levels, or depths. Also beware of anybody telling you there is only one "correct" way to fish a fly. You should run from well-meaning, but crippling, dogma. It helps a ton to be open mined & a little creative in fly fishing.

Nocturnal Fly Fishing: The Freaks Come Out At Night 

8/12/2015

 
You've probably heard it said that to catch the largest trout in the stream, you need to fish at night. This is mostly true. As you probably know, once a trout reaches a particular size, feeding on insect hatches are not enough to sustain it. These bigger fish become hunters of larger prey - mostly smaller fish but they'll also eat baby ducks & other such animals. These larger fish use the cover of darkness to hunt & so it becomes the best time for the angler after trophy trout.

The heat of summer can also be another reason to fish at night. During the day in the summer heat, water temps can reach a point where the trout's metabolisms slow down so much that they stop feeding. It may not be until late in the evening - perhaps during a summer hatch - when any trout begin to feed at all. On popular streams where this happens it means you'll have many other anglers on the water with you in the evenings. Perhaps it would be best to wait until they all went home?

I've done a bit of nocturnal fly fishing myself & can tell you that it can be an exciting & frustrating game. I'm still learning that game (boy, am I still learning), but there are a few things I've learned mostly the hard way:

-Don't ever fish any water that you haven't fished before in the daylight. The more you know the stretch of stream you're on at night, the better. You could get very hurt - or worse - if you go parading around in the dark on unfamiliar water. Always tell someone where you'll be fishing or fish with a friend.

You also need to know the lay of the land for casting as well, or you'll spend most of your time in the trees & bushes instead of the water. Also, knowing where to wade & walk will help you know that you're in the right position for casting to where the fish are, or at least to where they were in the daylight hours.

-Bring along a couple of flashlights: a small one for tieing on flies, changing tippets, etc & a larger one for getting to & from the stream. DO NOT shine the light on the water. You'll put down every fish for quite a ways. 

-It's best to fish when the moon is dark. Fishing during a bright full moon can be almost like fishing in daylight. The fish can see you very well. If you are fishing on a night with a lot of moonlight, hit the shady spots.

-Standard protocol for night fly fishing is to use a fly that puts a lot of vibration in the water - a palmered marabou or deer hair-headed fly. I've found this to be true, but you can also fish wets, nymphs, or dries as well.
     Nymphs: You want to get down on the bottom, with your fly bouncing along at the speed of the water current. Get a good, natural drift with no drag on your line. This could very well mean fishing upstream.
   Wets: Down & across seems to have always worked well for me. I like to fish these just below the surface. Also, you can get away with using a much larger wet fly than normal, 2 to 4 hook sizes bigger than you might during the day. I've also found a black colored fly works better for me than any other color. I don't know why this is, except maybe the trout can see the fly's silhouette better.
   Dries: I've fished dry flies at night, but unless there's some really big hatch activity going on in the middle of the night, like a spinner fall, I don't usually do that good with them. However, I have found that you can get away with some drag on your dry fly at night. A little movement to your dry fly, to imitate a fluttering spinner, actually seems to help. Maybe it draws the trout's attention?

-Night time fly fishing, no matter what time of year, is a slow game. The fish seem to slowly suck in your fly rather than lunge at them. At night trout seem to be feeding either on the bottom or just below the surface, too unless a large amount of insect activity is on the surface.

-Because it is slow at night, I try to slow down myself. I try to get really methodical & hit every spot in a pool or run many times. I'll work each spot over & over & in different ways, working my way through a run. Then I take a few minutes break & do it all over again - three times or more. Sometimes you pick up a good fish in a spot you had tried before.

-Water temp is just as important at night as it is in the day. Know the water temp where you're fishing. You need to find the water that is best for trout to be feeding in. This goes for all times of the year.

-Pick out spots you know have trout in them. You saw them during the daylight hours or did good there during the day time. Learn that spot very well. That's where to go at night.

Just remember that nocturnal fly fishing is a slow game. You won't always catch fish. Be patient & methodical. It's okay to just leave your nymph or streamer on the bottom for a while, not moving. When you do move them, try to get your flies to move at the speed of the current. You're going to miss some strikes for sure, & it will be frustrating at times, not being able to see as well as during the day. Still, it can be some of the best, most amazing fly fishing you'll ever do. Besides, what else would you be doing at 3 am, sleeping?!!?

Nymphs: The Weighting Is The Hardest Part - Part I

8/12/2015

 
Years ago a group of anglers around Centre County, PA did a study where they watched nymph patterns - tied with different weight - float down a real trout stream. They did this to see which way, if any, that you added weight to your nymphs how it would effect how they drifted. What they found was actually pretty interesting.

When tying nymph patterns most of us add a little weight to the fly by wrapping lead wire (or some other heavy wire) around the hook before any fur or feathers get tied on. Of course this isn't necessary to do & you should tie some nymphs without any weight. That aside, how we put that weight on the hook, with the wire, does have an effect on how your fly will perform in the stream.

What that studious group of anglers discovered was that nymph patterns that were of a flattened shape tended to drift through the water much more like the natural. That was the key to a more natural drift.

So, how do you get your nymph patterns more flattened? Easy, just flatten that wire on the hook before you put anything else on the hook. So when you're tying a nymph at the vise, wrap your weight around the hook, then take a pair of forceps & flatten the wire - crush it on the top & bottom & push it out at the sides. Then go about tying your fly as you normally would. When you bring your dubbing around the flattened wire it will follow the shape of that wire & have a more flattened appearance. You might have to flatten it a little more when you're done tying it, depending on the amount of dubbing you use, but usually not. Flattening the wire weight is usually enough.

Most of us add our weighted wire to our nymphs in the top third or half of our flies. That's fine. Look at a natural nymph & compare them to your fly. Getting that thorax flat seems to be the most important part.

You can add different amounts of weight to your nymphs as you tie. In fact, it's a good idea to do so, that way you'll have some that are heavier than others for getting deeper in the stream. If you do, I suggest that you color-code the head of the different weighted nymphs with different color thread. This way one glance will tell you if you have a heavy, medium, or light weighted nymph.

It turns out that if you don't flatten your nymph & leave it round, than it will want to float or drift upside down, with the hook bend pointed towards the surface. Real nymphs don't do that. They tend to rock, bounce, & crawl along the bottom with their bellies & legs pointed down at the stream bed.

So flatten your nymphs. You went to all that trouble to tie those flies with all that detail. What a shame it would be if you were missing fish because it was drifting upside down!!

The Tuck Cast

8/8/2015

 
This is a specialty cast used when nymph fishing - or anytime you want your fly on the bottom. It was made popular by George Harvey & Joe Humphreys. You may have heard of it before, but there seems to be a lot of misinformation out there about it. It's actually very easy & effective.

This cast is designed to get your nymph (or wet or streamer) on the bottom quickly & to keep it there during the drift. If you're wanting to fish the bottom, this is the cast to use because your fly will enter the water first - before your leader & line.

To perform the tuck cast you must move your knuckles & thumb of your casting hand in a horizontal plane. You don't want this cast going to one side or the other because you'll lose the momentum in the line.

Keep your thumb on top of your rod grip the whole time you're doing this cast. It should come straight over head & you want to keep your wrist straight with your thumb.

So, you basically keep your rod, hand, & wrist in a horizontal plane & make a normal back cast. Then, on the forward cast stop the rod abruptly at about the 10:30 position & squeeze the rod grip with your thumb pushing while pinky & ring fingers pull the grip towards you.

It will look strange at first as the line seems to fall onto the water & your fly comes almost straight down onto the stream. Remember, the point of this cast is to get your fly on the stream bottom quickly, & so it enters the water first - before your leader.

During the drift keep your rod tip up. This keeps too much slack line out of the mix & keeps you connected by feel to your fly. There is already some slack in the leader when the fly hits the water just by the nature of the cast, so don't allow too much or you'll be sure to miss quick strikes from the fish.

Some descriptions of this cast tell you to overpower the forward stroke. That is wrong. The key to this cast is to stop the rod & squeeze with the hand. That's it. Otherwise it's a natural, relaxed cast.

The higher you stop the rod (mixed with the amount of weight you use), the steeper the angle of which your fly enters the water. For deeper water stop the rod at a higher angle. For more shallow water, stop it a little lower. Just remember to keep your rod tip up as you drift your fly.

One hint: if you see that your fly is splashing down into the water too hard - making too violent of a crash landing - then you're probably overpowering the forward stroke. Your fly should look like it just fell from the sky as it enters the water, as if someone just dropped it from a a few feet above the water.

Here is a video of an angler employing a proper tuck cast. Watch as his leader seems to just fall onto the water. It might even look like a bad cast, but it isn't. It's exactly what he was after.
The tuck cast is an easy & very effective way to get your flies down on the bottom. Once you get the hang of it, be creative in how you use it: mend it in the air when you need to avoid fast currents between you & the location of the fish; work your rod tip like a jig fisherman during the drift; experiment with the amount of weight you use; so on & so on. This is an excellent cast to have in your bag of fly fishing tricks.

Fishing With Ants

8/2/2015

 
In the summer months, some of the best dry fly fishing can be done with a fly pattern designed to imitate an ant. In fact, ants & other terrestrial patterns can extend the hours you spend catching fish because they're perfect for those times, in the middle of the summer days, when you're waiting on the evening hatch to show up.

The best places to fish an ant pattern tend to be near the bank. If you can find a wash out, or a back eddy where the water has washed away some of the earth & made a nice hole, you should float your ant fly through there. Ideally, these places would have high over hanging tree branches above the water. Ants climb out on these limbs & fall off, into the water where waiting trout eat them. It's a good deal for the trout, too as these spots have shade from the hot summer sun & cover in the bank or roots of the trees (if they jut out into the water).

However, you don't need the trees to find ant-eating trout. Even in streams that flow through open meadows or cow pastures, you can still find ants on the water. Anywhere there's some taller grasses growing right up next to the water, there's a chance that ants will have fallen into the stream. Hitting these spots is a pretty good plan.

Fish these ant flies just as you would any other dry fly. That means a nice, drag free drift. You're going to have to adjust your leader & tippet, especially if the water is low & clear. Up stream fishing is also a good approach to use.

Picture
Remember, if there are enough natural ants on the water, the fish will move to where they are to feed on them, so pay attention: the trout may not be where they are when a mayfly or caddis hatch is on.

In addition to using the ant as a dry fly, you can also fish it as a wet. However, I've never had a ton of luck doing this myself. I almost always prefer to fish an ant as a dry. Still, if you do fish your ant as a wet make sure it rides high & just below the surface of the water. When they're feeding on ants, trout are almost always looking up.

Ever watch an ant that's fallen into the stream? Do it, you'll learn a lot. They try to kick & swim. They usually don't have enough mass to break through the water's surface, so they kick & try to walk across the water. It's almost always futile on the ants part, but it's the movement they make that you want to study. Try to imitate it a little with your fly as it you fish. Get it right & it could be the key to success.

One more thing about ants: they come in many different sizes. Even in your own back yard, I'll bet you could find a few different sized ants. So make sure you bring a bunch of different size ant fly patterns with you to the stream. You never know which size of ant is going to be on the menu for the trout on any given day.

Tying a basic ant pattern is pretty easy. With some practice even a beginner can whip out a dozen or more in no time. Below is a pretty good video showing you how to tie a basic black ant pattern:
Terrestrial fly patterns can be the key to some awesome summer fly fishing. Unlike hoppers & other terrestrial patterns, ants are abundant & everywhere throughout the season. It's a good bet that there are some floating down your favorite trout stream this summer. Go out & give them a try while you wait on the evening hatch. Good luck!!

    The Pliant Rod

    News from the shop of Chris Lantzy, Custom Rod Maker along with industry news, profiles of interesting characters, reviews, history, & whatever else strikes our fancy. Your comments & feedback are welcome. Please email me your thoughts.


     leather accessories

    Cases, bags, wallets, & other fine leather angling accessories.
    Picture

    instagram

    See more photos from the rod shop & stream sides!
    Picture

    SEE MORE ROD PHOTOS!!!

    Please visit my Flickr pages to see even more rod photos including those available for sale, different rod features, & more. I'll be continuing to add photos there, so check it often. 

    Watch Some Videos!!

    Take a look into the rod shop & see some rods in living color motion pictures!! Check out my youtube videos. 
    Picture

    Categories

    All
    Angling Art
    Angling Art
    Angling Profiles
    Books & Videos Etc
    Books & Videos Etc
    Books & Videos Etc
    Books & Videos Etc
    Favorite Flies
    Fly Fishing
    Fly Fishing
    General Angling News
    General Angling News
    Industry News
    Industry News
    Shop News
    Shop News
    Tackle Tips
    Tackle Tips
    Vintage Tackle
    Vintage Tackle

    Archives

    April 2021
    March 2021
    February 2021
    January 2021
    December 2020
    November 2020
    October 2020
    September 2020
    August 2020
    July 2020
    June 2020
    May 2020
    April 2020
    March 2020
    February 2020
    January 2020
    December 2019
    November 2019
    October 2019
    September 2019
    August 2019
    July 2019
    June 2019
    May 2019
    April 2019
    March 2019
    February 2019
    January 2019
    December 2018
    November 2018
    October 2018
    September 2018
    August 2018
    July 2018
    June 2018
    May 2018
    April 2018
    March 2018
    February 2018
    January 2018
    December 2017
    November 2017
    October 2017
    September 2017
    August 2017
    July 2017
    June 2017
    May 2017
    April 2017
    March 2017
    February 2017
    January 2017
    December 2016
    November 2016
    October 2016
    September 2016
    August 2016
    July 2016
    June 2016
    May 2016
    April 2016
    March 2016
    February 2016
    January 2016
    December 2015
    November 2015
    October 2015
    September 2015
    August 2015
    July 2015
    June 2015
    May 2015
    April 2015
    March 2015
    February 2015
    January 2015
    December 2014
    November 2014
    October 2014
    September 2014
    August 2014
    July 2014
    June 2014
    May 2014
    April 2014
    March 2014
    February 2014
    January 2014
    December 2013
    November 2013
    October 2013
    September 2013
    August 2013
    July 2013
    June 2013
    May 2013
    April 2013
    March 2013
    February 2013
    January 2013
    December 2012
    November 2012
    October 2012
    September 2012
    August 2012
    July 2012
    June 2012
    May 2012
    April 2012
    March 2012
    February 2012
    January 2012
    December 2011
    November 2011
    October 2011
    September 2011
    August 2011
    July 2011
    June 2011
    May 2011
    April 2011
    March 2011
    February 2011
    January 2011

    RSS Feed

Powered by Create your own unique website with customizable templates.