Custom Fly Fishing Rods by Chris Lantzy, Custom Rod Maker
  • Home
  • Split-Bamboo Fly Rods
    • Prudential Series
    • Classical Series
    • Custom Series
    • Mortised Fly Rods
    • Rod Tapers
  • Graphite & Fiberglass Fly Rods
    • Fiberglass Fly Rods
    • Classical & Custom Series Graphite
  • Available Rods
    • Available Reels, Accessories, etc.
  • Leather Accessories
  • Designing Your Custom Fly Rod
    • Frequently Asked Questions
    • Overveiw of Making A Split-Bamboo Rod
    • Tackle Tips
  • About
    • Rod Making Philosophy
  • Links
  • Contact
  • The Pliant Rod (Blog & News)
    • Beyond The Rod Shop
Custom Fly Fishing Rods by Chris Lantzy, Custom Rod Maker

the pliant rod:

blog & news

Assembling A Fly Tying Collection for A Beginner 

4/28/2014

 
You've seen them advertised : a kit containing everything you need to get started in fly tying including the basic tools & enough hooks & materials to tie up a few of the basic patterns. Maybe that's how you got started - or what you're using now. These kits are a great way to get started in fly tying & I always recommend a good quality kit for those looking to start tying their own. But what do you do after you've used those materials that came with the kit? 


If you're like most of us, you begin to collect materials a little at a time based on the patterns you want to tie. This takes time & if you should find a pattern that calls for something you don't have, then you'll be making another trip to the fly shop soon.

But some of us don't have a fully stocked fly shop just up the road. Those folks usually order their supplies through the mail. These days, with the cost of shipping, it isn't feasible to place an order for only a small pack of fur. You need to order more stuff to justify the shipping costs & to pay less in shipping. So what to do? At best you might be guessing what you'll need in the future & that might end up with you collecting a bunch of material you'll never use. That's wasted money.

So, if you're a beginning fly tier & wondering what you might need in way of supplies (now that you've exhausted your beginner's kit), here's a list of some basic materials that every fly tier should have on hand:

Hooks:
    -Wet / nymph: #12 - #16
    -Dry: #14 & #16
    -Streamer: #8 & #6
Materials:
    -soft hackle feathers in black, brown, & partridge.
    -black marabou feathers
    -animal hair: elk, buck tail, & white calf body hair.
    -body material: dubbing in both natural & colors of green,                           grey & brown
                          -peacock herl
                          -chenille in black, green, & brown
    -gold & silver tinsel, both round & flat.
    -pheasant tail feathers (these are used in many ways)
    -dry fly hackle: in grizzly & brown colors, sizes #14 & 16.

This list is intended only to give you a start in building a fly tying supply. I'm sure I've forgotten something, but you can tie a lot of different types of flies with the stuff listed above. Of course, if you know you're going to need something for a specific pattern remember that it's cheaper to buy this stuff in bulk when you can. Most of the materials listed above should last you quite a while, too as a little goes a long way when tying most flies. 

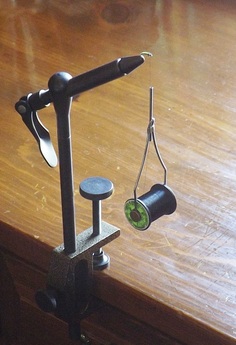
This list also assumes that you've got all the basic tools you need to tie flies like a vise, bobbin, scissors, thread, etc. Most kits come with all these tools anyway. The only upgrade you might want to make to your tools would be to get a new vise, as some kits don't include the best of vises. Now you don't need a fancy rotary vise with all the attachments. Those are nice, but you don't need them. In fact, I've been using my same old, simply designed Thompson vise for decades. It's basic, well built, economical, & serves me just fine.
Picture
I hope this list & info helps those of you who spend time looking over catalogs or websites scratching your head wondering how to start building a fly tying collection of materials. Just bear in mind that no matter how much stuff you amass thorough the years, you'll still find yourself needing a type of feather, fur, or hook that you don't have!!! Consider it just an occupational hazard to fly tying with so many different fly patterns in the world.

Fly Casting with Joan Wulff

4/24/2014

 
Joan Wulff has maybe taught more anglers how to cast a fly line than possibly anybody else. She's a world champion caster & knows her stuff, inside & out.


The more I learn about fly casting, the more I realize how much I don't know. Some casting instructions I've read run contradictory to some aspects in Joan's teaching (like the use of the wrist), but who am I to say? I mean, who can really argue with Joan's technique or the results?


So I thought I'd share this short video with you by Joan (the First Lady of fly fishing) where she discusses the basics of the normal fly cast. I'm betting that every one of us can take something useful from it to improve our own casting. I know I sure can!!

How Much Can A Trout Eat?

4/21/2014

 
Note: The following is just the rambling thoughts of me, your average angler.


I'm not a biologist, but I do take an active interest in the study of fish behavior - particularly of trout. Through the years I've observed, as I'm sure you have, trout acting in a way that didn't make sense. Wanting to know what would cause trout behavior strange to me I try to find the answers through research. When that doesn't work I ask an expert. Talking with a fish biologist usually leads to more questions from me, but I always learn something new & interesting (I suppose it will get to the point where the PA Fish Commission folks will cringe when they see me coming, if it hasn't already). 


A while back I had read, probably in a book by Edward R Hewitt, that given a choice of food a trout of average size will always select a nymph over a smaller fish. The thinking was that nymphs have a higher percentage of fat, thus more calories, in relation to their size. I'm kinda skeptical of this for a few reasons & I suspect this may be true only in a perfect world for the trout.


I've read, & been told by fish biologists, that trout are opportunistic eaters (a lot like me). If they can get a meal with very little effort on their part & with little risk, they will (again, a lot like me). In other words, a trout will almost always go for the biggest meal for the least amount of work. Could this be one reason why they sometimes get very selective when one type of food or bug is in abundance?


I've also had it explained to me that trout will gorge themselves on all foods when it's readily available. The idea of a trout being full or satiated with food is possible, but rare if conditions are favorable for them to feed.


This was proven to me one time when I decided to keep a couple of trout for my supper - I practice catch & release but I'm not against keeping a few for the frying pan once in a blue moon. Anyway, upon cutting one of my trout open I noticed that it's stomach was misshapen. Thinking something might be wrong with the fish, I cut the stomach open to see what was the matter. It turned out that nothing was wrong, the stomach was just jammed full. I found a lot of nymphs, some vegetation, & a dace (bait fish). I couldn't imagine this trout had anymore room in its stomach for anything at all, & yet it took my fly with the intention of packing it into it's belly with everything else it had in there!!


So, how much can a trout eat? A lot I guess. I also suppose that's good news for us anglers, too. Although it probably ruins my excuse for not catching any trout when I say "they must be full from eating yesterday's hatch"......maybe I'll just have to start blaming the weather!!!

Happy Easter!!!

4/18/2014

 
Picture
To all of you who celebrate the Holiday, may you have a peaceful, safe, & happy Easter!!

How To Make Dubbing

4/15/2014

 
So, I guess the technical definition of dubbing is any material which can be spun onto the tying thread  to form the body of a fly. Normally we use fur for this, like rabbit, fox, muskrat, or synthetic fibers. 

Way back in the day before synthetic fly tying materials & rotary vices, when folks tied flies they used silk thread (some still do) & would wax the thread to make dubbing. These days, it's general practice to take a small amount of fur & put it onto the thread by pinching the fur & thread between your thumb & finger, then twisting the two together. With today's nylon threads this works pretty well & will give you a nice clean tapered fly body.

For bushier, buggier bodies of fur you can make what is called a dubbing loop. This is easily done by taking a length of thread while tying the fly & literally making a loop on from the hook. Fur is then put between the sides of the loop, then the whole affair is twisted together. This will give you a rope that can then be wound around the hook to form the body, or part of the body.

But back when..... It was normal practice to make dubbing ropes separate from the fly hook. They could be made up on their own & later tied onto the fly, just the way someone would tie on chenille or tinsel, or what have you today. Also, because they were using silk thread, which might have been a little thicker than nylon, the color of the thread added to the overall effect of the rope.

One way to do this is to use a jig to make these ropes. This jig is a wooden block with posts (or tacks) at either end to wrap the thread around. There's a notch in the side to hold the thread loop partially open - about 2/3 rds of the way down the side of the block. The fur is added inside the loop, then the loop is closed & wound, or spun, tightly together to make the rope. Once it's done the rope is removed from the block.

The beauty of this method is that these ropes can be stored on cards with notches to hold them & used as needed. Taking the time to make them separate allows you to focus & get them right without messing up a fly in progresses, should you have problems.

Below is a video of author Dave Hughes showing how to do this with the wooden block. It's a long video in which Dave is showing a group all about how to tie the flymph, but it starts out with the making of dubbing. Only the first part deals with what we're discussing here, but the entire video is interesting.

Walton Powell & Hexagraph Fly Rods

4/14/2014

 
Hexagraph fly rods are graphite rods manufactured to look & feel like bamboo. Take yourself back to the 1980's (if you can). Graphite was the main material for fishing rods, fiberglass was out of fashion, & bamboo was all but a thing of the past. Enter the renowned rod maker Walton Powell, son of E.C. Powell, who looked around at the rods being made & thought that something was missing. He liked the advancements that graphite had brought to the fly rod industry, but thought that in our haste for ever faster fly rods, we were missing out on the feel of bamboo at the time. So he set about to fix this by experimenting with graphite, to make a graphite rod that felt like a bamboo rod.

At the same time across the pond in the United Kingdom, two other fellows (Jim Bruce & Ken Walker) had the same idea & were also messing around to make a bamboo-like graphite fly rod. Well, eventually all three of them got together & the Hexagraph fly rod was born.

Below is a vintage ad from 1990 by Walton Powell. He gives a brief description of the rods & how they came to be. In the ad, he's also offering an introductory sale price on these rods.......If only we had a time machine, as these rods now sell for more than twice as much as Walton was asking!!!

Hexagraph rods are, as you can assume from the last sentence, still being made today. This ad gives us a small glimpse back into the beginnings of this unique fly rod company.


(special thanks to my good friend Mr. Paul Williamson for sharing this ad with me)

Book Review: "The Caddis and The Angler"

4/10/2014

 
Picture
"The Caddis and The Angler" by Larry Solomon & Eric Leiser is a book that's title pretty much describes it's topic. I would easily label this as an all but forgotten classic book, but one which is worth every angler's time to read.


Published back in 1977 & reprinted once again in 1990, this book covers the wide range that is the caddis fly in a succinct & clear way. The writing style of these two authors is relaxed & informative without becoming too complicated. It's like listening to a more experienced angling friend tell you all about these bugs.


Spread out over about eight chapters, you'll find everything you need to know in this book to successfully fish caddis imitations. Along with describing the different caddis & their behaviors & environments, you'll also learn some great techniques for fishing them. They also include instructions on how to tie some specific patterns, too. The instructions are great with big photos & easy to follow instructions.


Personally, I really like this book. But how does it compare to THE book on the subject "Caddisflies" by Gary LaFontaine? Well, LaFountaine's book covers every detail - even the smallest - about the study of caddis, that's true. It's a big book & worth reading. This book, "The Caddis and The Angler" gets down to the point a lot quicker & focuses solely on what a fly fisher needs to know. In other words, this book is a functional guide to fishing caddis, while LaFountaine's book is a college degree in caddis!! I think you'd benefit from both, but I love this book for it's down to earth approach.


I've talked about caddis flies before (read it HERE) because they are so important to the angler, sometimes making up to half the trout's diet & especially in the first half of the season before the famously important mayfly hatches start for the year. I really believe that "The Caddis and The Angler" is a great book to guide you in imitating these bugs & one in which anglers of all levels will benefit from reading.

Considering Fly Proportions

4/8/2014

 
One of the biggest mistakes a beginning fly tier makes is to make their flies in the wrong proportions. Usually it's something like a body that's too thick, tails or wings too long, etc. This can be frustrating to the new fly tier because if the fly has the wrong shape or size, trout will probably ignore it. You may catch a few trout on you're disproportional fly, but not as many as you could be catching.
Picture
The concept of proportion in flies or fly tying can be difficult for the beginner to grasp. In fly tying, when we talk of proportion, we mean the relation of length, height, & thickness to wings, tail, body, etc. This is a difficult concept to master & is probably the single biggest difference between the flies tied by a competent tier & a master. A well proportioned fly almost always is a perfect representation of the natural insect & one of the most difficult concepts & techniques to master, which in most cases is the product of experience. So keep tying because the more you do, the better your flies & fly proportions will be.

Keep in mind that when, or if, a fly recipe calls for specific amounts of materials (3 turns of hackle; 6 fibers for the tail; etc) these are for a specific size of fly. If you're making a fly in a different size, you must adjust the amounts of material to suit the size you're tying & the hook you're using. So the size of the materials in the fly must change according to the size you're tying. You must keep the proportions to the proper ratio when making the same pattern in different sizes.
Picture
If you're unsure of what proportions your flies should be, a quick internet search will show you several versions of the figures shown here in this article. Also, any good instructional fly tying book will address the issue of fly proportions with charts & figures, too.


Ultimately, the proportion of your fly is only a generalization - there are no hard rules you absolutely must follow. If you tie your flies with consideration to the living insect, how "balanced" your flies are, & how pleasing they are to the fish (if that's possible to calculate), your flies will be successful "bug puppets" that will catch fish.

Fishing An Emerger Pattern

4/7/2014

 
Picture
An emerger fly is a pattern that imitates the stage of an insect's life as it's between a larva (caddis) or nymph (mayfly) & an adult insect. This is possibly the most vulnerable time in an aquatic insect's life. So as you can imagine, this pattern has grown in popularity because of how successful it is catching trout. Before this pattern angler's were missing an opportunity to imitate one of the trout's easiest meals. In fact, the first emerger was developed by Jim Leisenring and V.S.”Pete” Hidy which they called the "flymph". The pattern has since made more developmental changes through the years.


These emerger patterns can be adapted to any hatch, mostly by the colors you use & the size of the fly. As with all patterns knowledge of local insects trumps everything else. Emergers not only work well for imitating the emerging bugs they were initially designed to imitate, they also work well when fished as a wet fly, too. 


You can study the rise forms of the trout to determine what stage of insect the fish are taking, or see where in the water column they're eating the bugs. However, if you're paying close attention, you'll notice the very first insects of the hatch beginning to come off the water. It's at this very early stage of the hatch that you should tie on an emerger - before you see any large number of bugs in the air.


The common school of thought is that once the fully formed adult insects begin to appear on the surface, you should switch over to some form of dry fly. Well, next time try this: fish the emerger fly all the way through the hatch. Depending on the hatch you're fishing, this can work extremely well for you. The trout seem to continue to recognize the emerging insects as an easy meal - even after your fly is the only remaining form of emerger in the water. 


Throughout the hatch, experiment with how deep you put your pattern in the water. Emergers usually float in, or just under, the surface film, but there's no reason why you can't try to sink your fly or treat it with floatant to keep it high up on the surface. You can even swing these patterns like a traditional wet fly both during & before the hatch. The fly rising up through the water at the end of the swing will fool even the most careful of trout. The main thing is that you experiment with the depth of your fly throughout the hatch, because the trout will feed at different depths as the hatch progresses.


You might be surprised at what you discover doing this. Of course, all this experimenting takes great discipline while the trout are rising all around you. Still, you might be richly rewarded for continuing to fish the emerger pattern long after the hatch has come off, & you'll learn more about the feeding habits of trout & a few new tricks to catch trout.

The Picket Pin

4/3/2014

 
Hey, we're adding a new category here called "Favorite Flies" in which we'll focus on some different fly patterns that you might find useful & interesting.

Picture
The Picket Pin is a versatile wet fly that can be fished in many different ways. It has all the elements in it that trout seem to love. Fish it as a wet fly, a nymph, or as a streamer, the Picket Pin is one of the most useful patterns you can cast. It can successfully imitate a stone fly, mayfly, or caddis fly all at the same time. How can you get more versatile than that?

This pattern can be tied in just about any size, but I've mainly seen it in size 12 & up - mostly sizes 12 & 10. tying it on a hook too small would make it difficult to tie. 

This is an old pattern, first tied around the turn of the 20th century circa 1910. It get's it's name from the prairie squirrels in the western USA. These particular squirrels were named after the posts cowboys would carry to tie their horses to when in the open prairie & there were no trees handy to secure their horses. The way the squirrels stood up on their hind legs & their white coloration led the cowboys to call them "picket pin squirrels". The fly, who's wing is it's most prominent feature & made from the hair from a squirrel's tail, derives it's name from those critters. 

Below is a good video showing one way to tie this fly. There are many different methods you can use to make them up & you can even get creative substituting different materials. So give the Picket Pin a try the next time you're fishing below the surface. You might just be surprised at how well the trout like this pattern.
<<Previous

    The Pliant Rod

    News from the shop of Chris Lantzy, Custom Rod Maker along with industry news, profiles of interesting characters, reviews, history, & whatever else strikes our fancy. Your comments & feedback are welcome. Please email me your thoughts.


     leather accessories

    Cases, bags, wallets, & other fine leather angling accessories.
    Picture

    instagram

    See more photos from the rod shop & stream sides!
    Picture

    SEE MORE ROD PHOTOS!!!

    Please visit my Flickr pages to see even more rod photos including those available for sale, different rod features, & more. I'll be continuing to add photos there, so check it often. 

    Watch Some Videos!!

    Take a look into the rod shop & see some rods in living color motion pictures!! Check out my youtube videos. 
    Picture

    Categories

    All
    Angling Art
    Angling Art
    Angling Profiles
    Books & Videos Etc
    Books & Videos Etc
    Books & Videos Etc
    Books & Videos Etc
    Favorite Flies
    Fly Fishing
    Fly Fishing
    General Angling News
    General Angling News
    Industry News
    Industry News
    Shop News
    Shop News
    Tackle Tips
    Tackle Tips
    Vintage Tackle
    Vintage Tackle

    Archives

    March 2021
    February 2021
    January 2021
    December 2020
    November 2020
    October 2020
    September 2020
    August 2020
    July 2020
    June 2020
    May 2020
    April 2020
    March 2020
    February 2020
    January 2020
    December 2019
    November 2019
    October 2019
    September 2019
    August 2019
    July 2019
    June 2019
    May 2019
    April 2019
    March 2019
    February 2019
    January 2019
    December 2018
    November 2018
    October 2018
    September 2018
    August 2018
    July 2018
    June 2018
    May 2018
    April 2018
    March 2018
    February 2018
    January 2018
    December 2017
    November 2017
    October 2017
    September 2017
    August 2017
    July 2017
    June 2017
    May 2017
    April 2017
    March 2017
    February 2017
    January 2017
    December 2016
    November 2016
    October 2016
    September 2016
    August 2016
    July 2016
    June 2016
    May 2016
    April 2016
    March 2016
    February 2016
    January 2016
    December 2015
    November 2015
    October 2015
    September 2015
    August 2015
    July 2015
    June 2015
    May 2015
    April 2015
    March 2015
    February 2015
    January 2015
    December 2014
    November 2014
    October 2014
    September 2014
    August 2014
    July 2014
    June 2014
    May 2014
    April 2014
    March 2014
    February 2014
    January 2014
    December 2013
    November 2013
    October 2013
    September 2013
    August 2013
    July 2013
    June 2013
    May 2013
    April 2013
    March 2013
    February 2013
    January 2013
    December 2012
    November 2012
    October 2012
    September 2012
    August 2012
    July 2012
    June 2012
    May 2012
    April 2012
    March 2012
    February 2012
    January 2012
    December 2011
    November 2011
    October 2011
    September 2011
    August 2011
    July 2011
    June 2011
    May 2011
    April 2011
    March 2011
    February 2011
    January 2011

    RSS Feed

Powered by Create your own unique website with customizable templates.