Tackle Tips
This webpage is meant to be a resource for all fly anglers. Here you will find different short articles about the equipment & tackle we use in the sport of fly fishing, useful information to consider when purchasing a fly rod or other pieces of fly fishing equipment, along with useful tips on how to care for & maintain your fly fishing tackle to get the most use out of it. These articles have previously appeared in "The Pliant Rod". I hope that you will find them useful & helpful.
Useful suggestions about caring for your split-cane fly rod
The following are some suggestions you may want to keep in mind when using, handling, or storing your split-cane fly rod. If you’ve been using rods of split-cane make, then the information in this list is probably nothing new to you. If you’re new to split-cane rods, then the following points of interest will aide you in extending the useful life of your fly rod. Caring for bamboo rods is not that much more extensive than caring for any other fly rod made from more modern materials, but there are a few things a split-cane rod owner should keep in mind.
1.) Always wipe down the rod (including the ferrules) with a dry, soft cloth after use. Never ever put the rod away wet. It’s a good idea to carry a soft rag in your fishing vest so you can be in the habit of drying your rod after every use. Many experience split-bamboo rod users also carry in their vest two small pieces of rubber (inter tube rubber works well) in the unusual event the ferrules stick together because extreme temperature changes, etc. The rubber can provide extra “grip” when pulling the rod sections apart
2.) Please don’t store the rod next to a heat source or leave it in direct sunlight for extended periods of time (i.e. in a parked car). Doing so may cause the glue to fail.
3.) When removing the rod from the tube slide the entire rod out in the bag while making a ring with you thumb and forefinger over the tube to avoid banging and bending the guides against the tube. Do this when putting the rod into the tube too.
4.) I think it goes without saying, but never lay your rod on the ground or floor where someone might step on it and don’t lean it against a wall, etc, where it might get damaged. Also remember, most rod breaks happen at the car or truck when you’re stringing them up or tearing them down. Watch out for car doors, etc. When returning to the vehicle after an outing have the habit of putting your rod away before you do anything else. If your line gets caught in a tree, bush, etc while fishing don’t yank on the rod. Admit defeat, hold the rod straight at the tangle so the rod isn’t bent at all, & break the line free by pulling it straight back. More than one rod tip has snapped off because a tangled angler lost their cool.
5.) Periodically clean your rod with a soft cloth dampened with water. Follow that by coating the rod with a soft, liquid furniture polish. This should protect the varnish.
6.) Wipe the ferrules with a soft rag after every use. Periodically (when further cleaning is needed) clean the ferrules with rubbing alcohol and a soft rag. Use a cotton swab for the female ferrule. Quickly wipe off any excess alcohol. Never clean ferrules with any kind of abrasive – EVER!! Note: after some use, you may notice a separation of the thread wrap at the ferrules. This is a normal occurrence because of how the rest of the rod flexes in relation to the ferrules. It will not affect the rod’s performance & is a sign of a well used rod.
7.) When you put your rod together always hold the pieces with your hands close to the ferrules and push them straight together until the shoulder of the male is against the rim of the female. Never twist the ferrules. This causes stress on the bamboo that will lead to severe damage and a broken rod. If the line guides don’t line up, pull the sections apart and try again. When taking the rod apart, hold your hands a little farther apart and pull straight – do not bend or twist the rod. You should hear a “pop” sound when the ferrules separate. To remember this keep the old saying in your mind: “Rod together, hands together. Rod apart, hands apart.”
8.) When playing a large fish try to play it off the butt of the rod. Don’t play it only off the tip. After years of heavy fish the rod may take a set, or curve. Unless extreme this won’t effect how the rod casts or plays fish and may, in fact, add character to the rod.
9.) Always store your rod in the bag when it’s in the tube. When in the tube always store your rod with the ferrules pointed down.
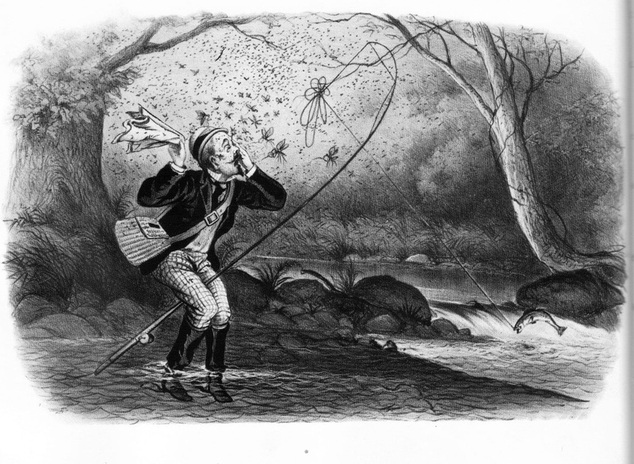
Watch that rod tip!
Which Fly Line To Use?
I thought I'd address a pretty common - & intelligent - question. Many folks, when getting a new rod from me often ask which type of fly line they should use with their new fly rod.
First off, some rod makers recommend specific models of line by specific manufacturers. They have designed their rods with this fly line in mind. When that's the case, I strongly suggest that you follow that rod maker's advice. A lot of time & thought went into it, so you're probably going to get the best results if you use the line they specify.
I don't design my rods in this way for a couple of really big reasons. One is that I don't trust the large tackle & fly line manufacturers to keep certain products in production & available. So I'm not going to go through all the hard work & time to design a rod with an exact model of fly line in mind, only to see that line become no longer available someday. Then we'd be left searching for "the next best thing" &/or not getting the most out of the rod. Another reason I don't design a rod to a specific model of line is because everybody casts a rod differently. There are so many variables when designing a rod that all a rod maker can really do is make a rod that meets the criteria for the fishing that the client has described & the way they fish. Make the BEST rod possible for those conditions & everything should be just fine.
So, when someone asks which line to use on their new rod, my answer varies based on the client's situation.
If you're an experienced angler & also keep up on all the latest tackle innovations, etc then I recommend that you use your judgement. You've cast many of the lines on the market, know the difference in how they act, & know you're own casting very well so use what you think is best for you - after you've wiggled the rod some.
If this is you're first custom made rod & you really want to see the difference between the factory-made rod you've been using & the new custom-made rod, then use the same make & model of fly line you've been using (in the correct weight for the new rod). This will truly show you the difference. With so many variables in the mix when it comes to comparing fly rods, using the same line will take away one of those & give you a better comparison between the two rods.
No matter what your situation (if your an experienced rod collector or getting your very first custom rod) I urge you to visit, or find, a local fly shop who's staff you trust. By all means take your new rod (& reel if you like) to the fly shop when looking to buy a new fly line. Show them your set-up & talk to them about the type of fishing you want to do with it. I'm sure any legitimate fly shop folks will be more than happy to work with you to get the best fly line for you onto your reel. Like rod makers, they want you to succeed & enjoy the sport.
How To Clean Your Fly Rod:
It's that time of year when many folks are getting out their fishing tackle & getting ready for the upcoming fishing season. If you just put your rod away last year without going over it, now's the time to give it the "once over" before you head out for the first time this year. Here's some quick tips on how to get that fly rod looking good again.
No matter if you have a graphite, fiberglass, or a bamboo fly rod after use they get dirty. Along with the dirt & grime that rods acquire from use, they sometimes get watermarks on the shaft from being in contact with a wet fly line. For these problems that arise from normal use (we're not talking about damage here), it's a good idea to gently clean the shafts of the rod with some liquid window cleaner (like windex, etc) & a soft, clean towel. Spray the window cleaner onto the towel & wipe down the rod shafts gently. Then follow that by wiping the shafts dry with another soft, clean, & dry towel. Make sure to get the area beneath the line guides & the guides themselves.
Next, if you have a bamboo rod with varnish, or a fiberglass or graphite rod with a gloss, shiny finish, go over the rod with a good furniture polish - the same kind you use around the house (Old English, Pledge, etc). Again, spray the wax on a clean, soft towel, & wipe off the wax with another dry towel. Make sure that you get the line guides as well but make sure you get all the excess wax off the line guides. If you don't, it will build up on the guides & slow your fly line down.
DO NOT WAX THE FERRULES!!! This is especially true for the metal ferrules of a bamboo rod. Never ever wax the ferrules. If you need to clean the metal ferrules of a bamboo or older fiberglass rod, put some rubbing alcohol onto a clean, soft towel & wipe the ferrules with the alcohol. Then wipe them again with a clean, dry towel. Make sure the towels are clean & do not have anything on them that will scratch the ferrules. To clean the inside of a metal female ferrule, dip a cotton swab into some rubbing alcohol & swirl it around inside the ferrule. Keep doing this with a fresh cotton swab each time until they no longer have dirt on them. Then dry the inside of the female ferrule with a dry cotton swab before assembling the rod.
If you have a rod with a matte finish, just clean the rod with the liquid glass cleaner, or warm water only. Don't wax the shafts of the rod, but you can wax the line guides & the guide wraps if you wish.
Finally, after you've cleaned & polished the rod, I like to go over it one more time with a "dry sweeping cloth" (like "swifter") that are available at most retail stores. This really polishes the rod up & gives it a nice appearance. It also removes fingerprints & other smudges.
Regular cleaning helps to protect the finish of the rod & to protect the guide wraps & labels or inscriptions on the rod shafts. If you take the time to clean your fly rod & keep it looking good, you'll be going a long way to getting more years of use from it.
Fixing A Broken Rod Tip...
It happens - sometimes to even the most careful of anglers. It might not even be your fault. The delicate tips of fly rods can & do get broken in countless ways. The majority of the time, it's a car or truck door. That's why you should NEVER lean you rod in the crook of an open car door. When it happens, though you've got to move on. But what if that was your favorite fly rod? You don't want to retire it - ever.
Most tip breaks are close to the tip top - usually an inch or two down from the top. If that's happened to your rod you can fix it & (overall) it shouldn't effect the action of the rod too much. Plus, this is a fix you can handle yourself pretty easily, with a little guidance. Here's how you do it:
1.) Prepare the rod for a new tip top where it broke off. If there are shards of material (graphite, fiberglass, bamboo) you'll have to carefully cut them off with a very sharp razor blade. You want a nice, even tip top - like it was when it was being built, only shorter now. After any shards have been dealt with, lightly sand the area where the new tip top will go with 1,000 grit sandpaper. Get the area nice, smooth, & clean.
2.) Find the size of top guide you'll need. There's a good chance that it will be a different size than the original, but even if it's the same size, now's a great time to put a new guide that's brand new on your rod. Tip tops, or top guides, are measured in 64ths of an inch. So, measure the diameter where your new tip top will go (best done with calipers, etc) & determine the size of top guide you'll need. There are many places to buy fly rod tip tops. HERE is my personal favorite.
3.) With the new tip top in hand & the rod ready, take a small needle file (or even a bent paper clip) & make sure there is no debris inside the new tip top. Once your sure it's clean inside, dry fit the tip top on the rod. It wouldn't be a bad idea here to put a small piece of masking tape below where the tip top will go. Mark a line on the tape that will help you line up the new tip top with the other line guides. This will make it easier when positioning the new tip top on the rod.
4.) Mix up a small portion of two part epoxy. It's better if you use an epoxy with a slow set-up time & a high bond strength. With a small round toothpick, put some of the epoxy into the tip top's tube. Next put a little on the end of the rod. Now gently slide the new tip top onto the rod. You might hear small "popping" sounds - that's okay because that's the air escaping from around the glue. Don't use too much pressure - the rod should never bend while you're doing this. Make sure you have the tip top lined up with the other line guides - sight down the rod section to make sure - & then clean up any excess glue with rubbing alcohol (or whatever the epoxy manufacturer recommends. Now set the rod aside, allowing the glue to set up completely.
That's it!!! It's really not that hard & I think just about anybody can handle this job. With a little time & patience, your fly rod will be back on the stream landing fish in no time.
As always with rod repairs, if you run into problems or have questions before you start, contact a competent rod maker. Of course I'm always willing to help you out, & you should feel free to email me anytime. I hope this little tutorial has helped at least a few heartbroken anglers.
How To Wrap (or re-wrap) A Line Guide
Replacing a bent or broken line guide is something every angler will have to deal with sooner or later. It's a simple job, if you know how to do it.
First, remove the old wrap & guide. Using a razor blade, cut from the end of the guide foot towards the center of the guide. Go slowly & make many passes if you don't cut all the way through the thread the first time. Take great care not to cut the rod shaft. Now peel away the old wrap & the guide will be free from the rod once you've cut the thread from both guide feet.
Next, clean up the rod shaft where the old wrap & guide were with wet 1,000 grit sandpaper. Gently sand away any ridges of old varnish, making the rod at this spot smooth. Be careful not to sand too much. Don't remove any of the rod's varnish on the shaft or the color coating of a synthetic rod - just the old wrap varnish.
Now take the new replacement guide & grind down the feet of it so that there is a gentle, curved shape to each guide foot. This is easily done with either a fine cut metal file or quickly by just kissing the guide foot on a belt sander. This will make it easier to wrap the thread over the guide foot where it meets the rod.
If you're replacing every guide on the rod you'll need to mark out where each guide should be along it's length. You can mark their locations with a pencil or with a small piece of tape. Place the guide at the location & tape one foot of the guide down to the rod. You'll begin by wrapping the un-taped foot first.
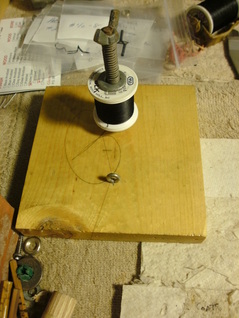
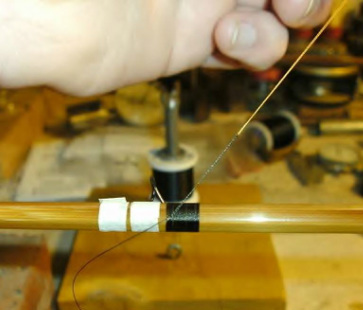
Now take the thread for the wraps & put it under slight tension. There's many ways to do this. You can make your own tension device (like the one pictured below), buy a commercial rod wrapper, or simply put the thread spool in a bowl & run the thread through the pages of a closed book. Either way you'll need some kind of slight tension on the thread.
Now take the thread for the wraps & put it under slight tension. There's many ways to do this. You can make your own tension device (like the one pictured below), buy a commercial rod wrapper, or simply put the thread spool in a bowl & run the thread through the pages of a closed book. Either way you'll need some kind of slight tension on the thread.
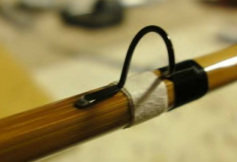
Begin the wrap just in front of the guide foot - about 1/8 inch before the guide. You'll be wrapping toward the center of the guide. Take the end of the thread & wrap it around the rod shaft. Hold it in place. Now turn the rod & as the thread comes off the spool lay it over the tag end.
Going in this direction the tag end of thread will be pointed towards the center of the guide. Give it a gentle pull to tighten the thread on the rod shaft & continue turning the rod & wrapping the thread from the spool onto the rod. After the tag end is secure (about 1/4" of it is under the wrap) cut it off with your fly tying scissors or a sharp razor blade.
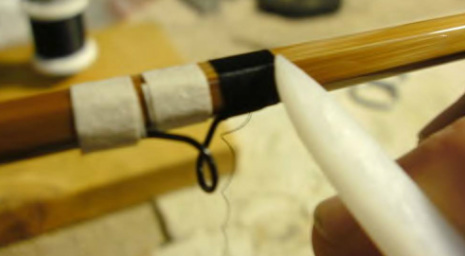
Continue wrapping the the thread from the spool onto the rod, making sure each pass of thread lies next to the previous one with no gaps in between the thread. Every now & then you'll have to push the turns of thread together to avoid gaps. You can use either your fingernail, a smooth bone-folder, or a similar tool like the round body of a writing pen. Push the thread together gently - you don't want them to roll over each other - you want them to lay together with no gaps in between.
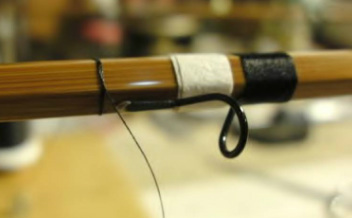
As you continue to wrap up & over the guide foot try to keep an eye on the tension of the thread. When you get to a point where you're about six rod revolutions or so from the center end of the guide foot, stop. Take a loop of thread made from another spool of thread & lay it under your last wrap. Make sure the loop is pointed in the direction you're wrapping (towards the center of the guide). Now continue to wrap over this loop for the last few wraps.
Continue wrapping the the thread from the spool onto the rod, making sure each pass of thread lies next to the previous one with no gaps in between the thread. Every now & then you'll have to push the turns of thread together to avoid gaps. You can use either your fingernail, a smooth bone-folder, or a similar tool like the round body of a writing pen. Push the thread together gently - you don't want them to roll over each other - you want them to lay together with no gaps in between.
As you continue to wrap up & over the guide foot try to keep an eye on the tension of the thread. When you get to a point where you're about six rod revolutions or so from the center end of the guide foot, stop. Take a loop of thread made from another spool of thread & lay it under your last wrap. Make sure the loop is pointed in the direction you're wrapping (towards the center of the guide). Now continue to wrap over this loop for the last few wraps.

When your wraps get to the center of the guide & the loop is under the last few wraps, place your thumb on the end of the wrap so it doesn't unravel as you cut the thread from the spool. With the thread cut away from the spool, take the tag end (the end you just cut) & put it through the loop. Now pull the loop out from under the wrap, taking the tag end of the thread with it. Remember to keep your thumb on the end of the wrap the entire time you're doing this.
Next take a the same tool you used to push the threads together while you were wrapping & smooth out the threads of the wrap. Sometimes small twists will occur in the thread as you wrap. You need to smooth them out so there are no gaps & the thread lays flat.
Congratulations, you just wrapped a guide foot. Now remove the tape from the other foot & wrap it. Repeat all of this for every guide. Once you're done wrapping you'll need to coat the wraps with some kind of finish: typically epoxy for synthetic rods & varnish for cane rods. The more you do this, the easier it will get. If you can tie a fly, then you can wrap a line guide with practice & patience.
NOTES:
-Practice on a wooden dowel rod before you try this on a rod.
-Matching the color of the old wraps: thread color will change when coated with epoxy or varnish. Try a few different spools of thread that are close in color on a dowel rod. Coat them with your finish to see which one matches your old wraps.
-Especially in the beginning it's much easier if you have something to hold or cradle the rod for you. You can use a sturdy cardboard box with one side cut away & V grooves cut into the sides. Be creative.
-There are many different ways to wrap a guide. No one way is better than another. Eventually you won't need any tape to hold the guides down or anything to cradle the rod for you. All the techniques I described are for someone trying this for their first time. Good luck!!!
Repairing Loose Fitting Ferrules on Graphite and Fiberglass Fly Rods
(This is for modern synthetic rods only. The process to repair metal ferrules is completely different. Do not attempt any of this on metal ferrules)
The ferrules on a rod will sometimes become loose fitting with age & use. This can be a fairly normal condition on an older rod that’s been used a lot – especially if a rod has seen many years on the water. When the ferrules get to the point that the tip section of the rod wants to fly off of the butt section when casting, something has to be done. If you’ve been using the rod for years then I doubt you’ll want to retire the rod. The only satisfactory thing to do is to fix the ferrules.
There are two types of ferrules seen on modern synthetic fly rods: the tip-over-butt design, & the spigot ferrule. No matter which ferrule your rod has, they function in the same way in that they hold the rod together by a friction fit. In other words, a male section (most likely tapered to some degree) slides into a female section (also most likely tapered) until the friction between the two holds the two rod sections together. Anyone who’s ever put a rod together knows this. But when the fit between the male & female ferrules loosen with age & use this friction fit will no longer work. Consider how many times a rod gets put together & taken apart, add in stresses put on the ferrules while casting & fighting fish, & it’s no sin for a rod that’s seen a lot of action to have loose ferrules.
A small piece of advice before we start: know thyself. If you are not at all “handy” or you have no experience repairing the material things in your life do not attempt to fix your rod’s ferrules. Leave it to a competent rod maker. However, if you’re the do-it-yourself type & enjoy tinkering with things, then don’t shy away from doing this yourself. It’s not that difficult of a job & with careful patience you will be successful.
If the ferrules have worn to the point that they no longer hold the rod together there can only be one reason: wear. Either the female or the male ferrule has worn away causing the slippage. So, which part should you repair, male or female? I highly recommend working on the male section, even if it’s the female section that’s worn. That’s because it’s very difficult to do any accurate work inside the female section. The male is out in the open where you can get at it & work evenly all the way around it. So here we will focus on the male ferrule section.
The trick is to build up the male section with new material until it fits snuggly into the female section again, like it did when it was new. Here’s the supplies you’ll need:
-2 part epoxy glue. The longer the set-up time, & stronger bond strength, the better.
-1 cheap, small hobby paint brush (the ones modelers use)
-500 & 1,000 grit sandpaper cut into several small pieces about 2” long by ¾” wide
-0000 steel wool
-Isopropyl (rubbing) alcohol – or whatever agent is recommended to clean up the glue (check the instructions on the glue)
-Plenty of patience & time – especially the first time you attempt this job
Here are the steps to take:
1.) Mix the epoxy according to the directions. Mix only a small amount, you don’t need a lot.
2.) If you repairing a rod with the tip-over-butt style ferrule, mark the butt section with a felt tip pen where the female (tip) ferrule ends on the butt section. Do not work below this point.
3.) With the small hobby paint brush, coat the male ferrule section with the epoxy as evenly as possible. Do NOT put a lot on. The lightest coat that you can evenly spread on will do.
4.) Let the rod set overnight. Place it in such a way that the epoxy won’t run down onto the rod where you don’t want it. Place the rod horizontally & turn the rod often to keep the epoxy from building up on one side of the ferrule.
5.) The next day, after the epoxy is completely set, check the ferrule fit. If they are still loose, then repeat the previous steps. If the rod sections will not go together (the male is now too big to fit), you’re ready to proceed re-fitting the ferrules.
6.) Starting with 500 grit sandpaper lay the rod’s butt section (or the sect w/ the male ferrule) across your lap. With your hand flat on the rod, roll it back & forth across your thigh while holding the sandpaper on the male section with your other hand. Hold, or pinch, the sandpaper around the male section as you roll the rod back & forth across your lap. Hold the sandpaper with just enough pressure to allow the rod to roll. This is sometimes referred to as a “lap lathe”. Here you don’t move the sandpaper, you move the rod.
7.) Start at the far end of the male & work your way down towards the grip end, checking & re-checking the fit between the sections quite often. As you begin to get more & more of the male section to fit properly, mark it with a pencil at the point where it stops inside the female. Now continue working down from that point.
8.) Continue turning the rod & sanding away the epoxy until the ferrules fit completely as they should. This will take some time, so be patient. You will eventually get there.
9.) Finish the job by lightly polishing the male ferrule section with 1,000 grit sandpaper followed by 0000 steel wool.
Notes:
-I use epoxy because it’s strong, hard, & waterproof. Just make sure you use it sparingly. The more of it you coat on the ferrule, the more sanding you will have to do.
-It’s not uncommon for a ferrule to be worn on only one side (typically towards the guides). As you roll the rod while sanding, you’re actually re-centering the ferrule’s fit. Be sure to roll the rod evenly. As you progress with the sanding you may find that you end up with epoxy on only one side of the male, or only in certain places. Don’t be shocked if you end up sanding away almost all the epoxy you put on. That’s okay. Sometimes it’s only one small section that was worn causing the ferrules to become loose. The epoxy will fill in all the low & uneven spots on the male section.
-Let the fit between the sections be your guide. For rods with spigot ferrules, if there was a small gap between the sections when the rod was new, try to keep that gap when doing this job.
-It’s very important to polish the male section (1,000 grit & 0000 steel wool). Any rough spots of epoxy left may catch on the female section & be torn off, thereby undoing everything you just did. Run your fingertips along the male section when you’re done working. It should feel even & smooth.
-If you go too far, sand off too much epoxy, & the ferrules become loose again don’t panic-It’s not the end of the world. You’ll just have to start over. Just be sure not to sand away so much that you remove any of the original ferrule material. Even then you can still fix it, you’re just making more work for yourself.
-Lawn cast the rod before you take it fishing. Really put it through its paces to make sure the two rod sections will hold together. Better to find out there’s still a problem on the lawn then the moment you’ve hooked into a nice fish.
While all this may sound complicated, it’s actually a very simple job to do. With some time & patience you’ll have that old favorite rod of yours back to catching fish again. Now go dig that rod out from the back of the closet & get to work. Both of you still have a lot of fish to catch.
How To Clean A Cork Grip
From time to time, someone will contact me who is attempting to repair or restore a fly rod themselves. I'm always glad to hear from these folks & help them out. I think if you have an old rod that only needs minor work done on it, like new line guides or just a good & proper cleaning, than you'll get more out of it by doing that work yourself. By doing simple repairs on your own I think you'll find the process of learning how the work is done both rewarding & fun.
One of the questions I get asked the most is how to clean a cork grip. Any rod that's seen any use fishing will have dirt & grime built up on the cork handle. Years of use will result in a grip that has a patina covering its entire surface. Many folks who have recently bought an older vintage rod would like to have that patina removed, so that they can start with fresh, clean cork as they begin using the rod. Well, cleaning a cork grip is easy & it doesn't involve any dangerous chemicals or special tools &/or supplies. All you need to clean a cork grip is a sink with running water & some mild dish detergent. Here's how it's done:
Holding the rod grip under the faucet, run some room temperature water over the grip in your sink. Get some mild dish washing detergent (the powdered kind like you use in the dish washer) & rub the detergent gently into the cork as the water pours over it. Don't rub too aggressively, just enough to work into the surface dirt of the grip. This will loosen all that dirt & grime build up on the cork. As the powdered dish detergent washes away, sprinkle some more on the grip. I suggest working around the grip & also working from one end to the other. Continue rinsing & washing the cork as you work. When the cork's all clean, rinse it thoroughly to get all the detergent off, pat it dry with some paper towels & let it sit overnight. That's it. Pretty simple, huh?
There are just a couple of points to consider when doing this:
1.) Never do this to a bamboo rod when there is no varnish on the rod, or the varnish is in bad shape. The varnish protects the bamboo & the glue holding the rod together. Depending on the rod you have, the water & soap may harm the rod's glue.
2.) If you're going to be taking sand paper to the grip to re-shape it, or for any reason -NEVER do any sanding of the cork until the cork has completely dried. This means letting the grip sit to air dry overnight at least & maybe a couple of days in a humid environment. Even though the cork may look dry an hour or so after washing it - it's not. The fresh, exposed cork surface has absorbed the water & the cork has swelled somewhat in size. As the cork dries it will take on it's original size. If you go sanding the grip while there's still water deep within it, the next day you may find that the grip is much smaller than you wanted.
Cleaning the cork on your fly rod is easy & after years of heavy use, it might not be a bad idea. Then again, there are folks who want that dark patina on their rod's grip as it's proof of a well used, experienced fly rod. Either way, if you want a clean grip, don't shy away from doing it yourself. As you can see, it's not hard to get good results when cleaning a cork grip.
©2010 - 2024 Chris Lantzy, Custom Rod Maker
