Replacing a bent or broken line guide is something every angler will have to deal with sooner or later. It's a simple job, if you know how to do it.
First, remove the old wrap & guide. Using a razor blade, cut from the end of the guide foot towards the center of the guide. Go slowly & make many passes if you don't cut all the way through the thread the first time. Take great care not to cut the rod shaft. Now peel away the old wrap & the guide will be free from the rod once you've cut the thread from both guide feet.
Next, clean up the rod shaft where the old wrap & guide were with wet 1,000 grit sandpaper. Gently sand away any ridges of old varnish, making the rod at this spot smooth. Be careful not to sand too much. Don't remove any of the rod's varnish on the shaft or the color coating of a synthetic rod - just the old wrap varnish.
Now take the new replacement guide & grind down the feet of it so that there is a gentle, curved shape to each guide foot. This is easily done with either a fine cut metal file or quickly by just kissing the guide foot on a belt sander. This will make it easier to wrap the thread over the guide foot where it meets the rod.
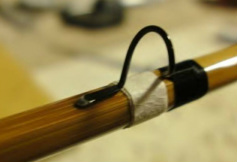
If you're replacing every guide on the rod you'll need to mark out where each guide should be along it's length. You can mark their locations with a pencil or with a small piece of tape. Place the guide at the location & tape one foot of the guide down to the rod. You'll begin by wrapping the un-taped foot first.
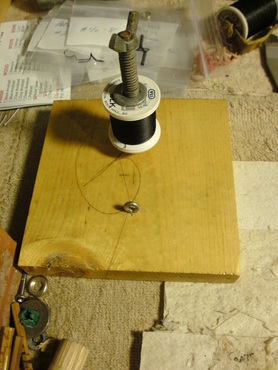
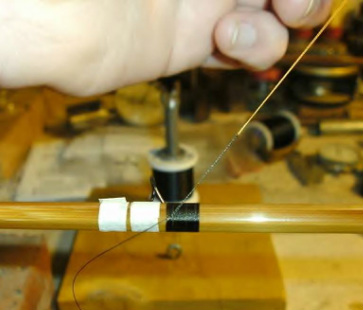
Now take the thread for the wraps & put it under slight tension. There's many ways to do this. You can make your own tension device (like the one pictured below), buy a commercial rod wrapper, or simply put the thread spool in a bowl & run the thread through the pages of a closed book. Either way you'll need some kind of slight tension on the thread.
Now take the thread for the wraps & put it under slight tension. There's many ways to do this. You can make your own tension device (like the one pictured below), buy a commercial rod wrapper, or simply put the thread spool in a bowl & run the thread through the pages of a closed book. Either way you'll need some kind of slight tension on the thread.
Begin the wrap just in front of the guide foot - about 1/8 inch before the guide. You'll be wrapping toward the center of the guide. Take the end of the thread & wrap it around the rod shaft. Hold it in place. Now turn the rod & as the thread comes off the spool lay it over the tag end.
Going in this direction the tag end of thread will be pointed towards the center of the guide. Give it a gentle pull to tighten the thread on the rod shaft & continue turning the rod & wrapping the thread from the spool onto the rod. After the tag end is secure (about 1/4" of it is under the wrap) cut it off with your fly tying scissors or a sharp razor blade.
Continue wrapping the the thread from the spool onto the rod, making sure each pass of thread lies next to the previous one with no gaps in between the thread. Every now & then you'll have to push the turns of thread together to avoid gaps. You can use either your fingernail, a smooth bone-folder, or a similar tool like the round body of a writing pen. Push the thread together gently - you don't want them to roll over each other - you want them to lay together with no gaps in between.
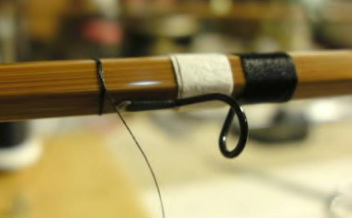
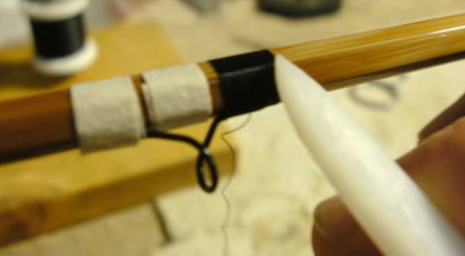
As you continue to wrap up & over the guide foot try to keep an eye on the tension of the thread. When you get to a point where you're about six rod revolutions or so from the center end of the guide foot, stop. Take a loop of thread made from another spool of thread & lay it under your last wrap. Make sure the loop is pointed in the direction you're wrapping (towards the center of the guide). Now continue to wrap over this loop for the last few wraps.
Continue wrapping the the thread from the spool onto the rod, making sure each pass of thread lies next to the previous one with no gaps in between the thread. Every now & then you'll have to push the turns of thread together to avoid gaps. You can use either your fingernail, a smooth bone-folder, or a similar tool like the round body of a writing pen. Push the thread together gently - you don't want them to roll over each other - you want them to lay together with no gaps in between.
As you continue to wrap up & over the guide foot try to keep an eye on the tension of the thread. When you get to a point where you're about six rod revolutions or so from the center end of the guide foot, stop. Take a loop of thread made from another spool of thread & lay it under your last wrap. Make sure the loop is pointed in the direction you're wrapping (towards the center of the guide). Now continue to wrap over this loop for the last few wraps.
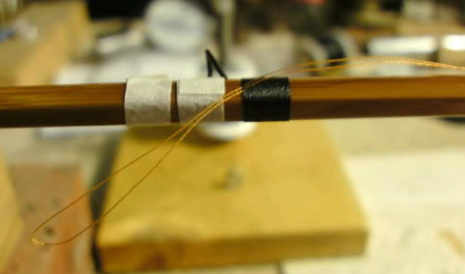
When your wraps get to the center of the guide & the loop is under the last few wraps, place your thumb on the end of the wrap so it doesn't unravel as you cut the thread from the spool. With the thread cut away from the spool, take the tag end (the end you just cut) & put it through the loop. Now pull the loop out from under the wrap, taking the tag end of the thread with it. Remember to keep your thumb on the end of the wrap the entire time you're doing this.
Next take a the same tool you used to push the threads together while you were wrapping & smooth out the threads of the wrap. Sometimes small twists will occur in the thread as you wrap. You need to smooth them out so there are no gaps & the thread lays flat.
Congratulations, you just wrapped a guide foot. Now remove the tape from the other foot & wrap it. Repeat all of this for every guide. Once you're done wrapping you'll need to coat the wraps with some kind of finish: typically epoxy for synthetic rods & varnish for cane rods. The more you do this, the easier it will get. If you can tie a fly, then you can wrap a line guide with practice & patience.
NOTES:
-Practice on a wooden dowel rod before you try this on a rod.
-Matching the color of the old wraps: thread color will change when coated with epoxy or varnish. Try a few different spools of thread that are close in color on a dowel rod. Coat them with your finish to see which one matches your old wraps.
-Especially in the beginning it's much easier if you have something to hold or cradle the rod for you. You can use a sturdy cardboard box with one side cut away & V grooves cut into the sides. Be creative.
-There are many different ways to wrap a guide. No one way is better than another. Eventually you won't need any tape to hold the guides down or anything to cradle the rod for you. All the techniques I described are for someone trying this for their first time. Good luck!!!


 RSS Feed
